Toyota Sienna Service Manual: Removal
CAUTION:
- Wear safety gloves, because the sharp surfaces of the seatback frame and seat adjuster may injure your hand.
- Work must be started more than 90 seconds after the
ignition switch is turned to the LOCK position and the
negative (-) terminal cable is disconnected from the
battery.
(The SRS is equipped with a back-up power source. If work is stated within 90 seconds from disconnecting the negative (-) terminal cable of the battery, the SRS may deploy.)
HINT: Use the same procedures for the RH side and LH side.
1. REMOVE FRONT SEAT HEADREST ASSEMBLY
2. REMOVE FRONT SEAT ASSEMBLY LH
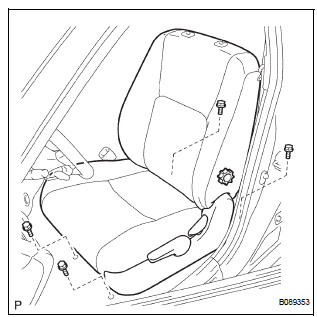
- Using a screwdriver, pry out the 2 seat track covers.
HINT: Tape the screwdriver tip before use.
- Disconnect the connectors under the seat assembly.
- Remove the 4 bolts and the seat assembly.
NOTICE: Be careful not to damage the body.
 Front seat assembly (for Manual Seat)
COMPONENTS
...
 Disassembly
1. REMOVE FRONT SEAT SIDE TABLE LEG COVER (w/
Table)
Using a screwdriver, disengage the claws and
remove the seat side table leg cover.
HINT:
Tape the screwdriver tip before use.
2. ...
Other materials:
Registration
1. REGISTRATION TRANSMITTER CODE
HINT:
The garage door opener is built in the dome lamp
assembly No.1. When transmitter codes for garage door,
gate, entry gate, door lock, home lighting system or
security system are registered with the garage door
opener, be sure to register them again wheneve ...
Initialization
1. ZERO POINT CALIBRATION
NOTICE:
Make sure that the front passenger seat is not
occupied before performing the operation.
HINT:
Perform the zero point calibration and sensitivity check if
any of the following conditions occur.
The occupant classification ECU is replaced.
A ...
Problem symptoms table
Use the table below to find the cause of the problem. The
numbers indicate the priority of the likely cause of the
problem. Check each part in order. If necessary, replace
these parts.
Front A/C:
Rear A/C:
...
