Toyota Sienna Service Manual: Removal
1. REMOVE FRONT WHEELS
2. REMOVE ENGINE UNDER COVER NO.1
3. DRAIN AUTOMATIC TRANSAXLE FLUID
(a) Remove the drain plug, gasket and drain ATF.
(b) Install a new gasket and the drain plug.
Torque: 49 N*m (500 kgf*cm, 36 ft.*lbf)
4. REMOVE FRONT DRIVE SHAFT ASSEMBLY LH
HINT: (See page DS-6)
SST 09520-01010, 09520-24010 (09520-32040)
5. REMOVE FRONT DRIVE SHAFT ASSEMBLY RH (for 2WD)
HINT: (See page DS-6)
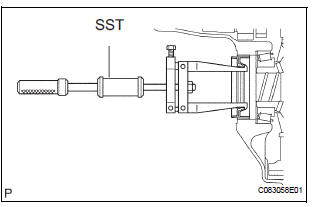
6. REMOVE TRANSAXLE HOUSING OIL SEAL
(a) Using SST, pull out the oil seal.
SST 09308-00010
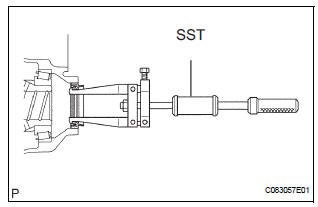
7. REMOVE DIFFERENTIAL SIDE BEARING RETAINER OIL SEAL
(a) Using SST, pull out the oil seal.
SST 09308-00010
 Differential oil seal
COMPONENTS
...
 Installation
1. INSTALL TRANSAXLE HOUSING OIL SEAL
(a) Using SST and a hammer, install a new oil seal.
SST 09316-60011 (09316-00011)
Oil seal installation depth:
-0.5 to 0.5 mm (-0.020 to 0.020 in.)
(b) ...
Other materials:
For vehicles equipped with mobile communication systems
FOR VEHICLES EQUIPPED WITH MOBILE COMMUNICATION SYSTEMS
(a) Install the antenna far away from the ECU and
sensors of the vehicle electronic systems as
possible.
(b) Install an antenna feeder at least 20 cm (7.87 in.)
away from the ECU and sensors of the vehicle
electronic systems. For de ...
Transfer
SST
RECOMMENDED TOOLS
EQUIPMENT
LUBRICANT
SSM
...
System normal condition check
1. CHECK NORMAL CONDITION
If the symptom is applicable to any of the following,
it is intended behavior, and not a malfunction.
Symptom
Answer
A longer route than expected is chosen.
Depending on the road conditions, the radio and navigation assembly
m ...
