Toyota Sienna Service Manual: Removal
1. DRAIN AUTOMATIC TRANSAXLE FLUID (See page AX-131)
2. REMOVE NO. 1 TRANSFER CASE PLUG (See page TF-8)
3. REMOVE TRANSFER DRAIN PLUG
(a) Remove the transfer drain plug, gasket and bleed the drain transfer oil.
4. REMOVE FRONT WHEEL
5. REMOVE FRONT DRIVE SHAFT ASSEMBLY RH
HINT: (See page DS-5)
6. REMOVE TRANSFER RH BEARING RETAINER OIL SEAL
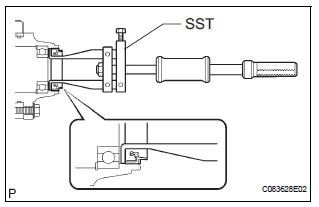
(a) Using SST, remove the transfer RH bearing retainer oil seal.
SST 09308-00010
NOTICE: Do not damage the oil-seal-fitted surface of the case.
 Bearing retainer oil seal
COMPONENTS
...
 Installation
1. INSTALL TRANSFER RH BEARING RETAINER OIL SEAL
(a) Using SST, install a new transfer RH bearing
retainer oil seal to the transfer case at the position
as show in the illustration.
SST 09223- ...
Other materials:
No Master/ Connection Check Error
DTC 01-D6 No Master
DTC 01-D7 Connection Check Error
DESCRIPTION
HINT:
*1: Even if no fault is present, this trouble code may be stored
depending on the battery condition or
engine start voltage.
*2: When 210 seconds have elapsed after disconnecting the power
supply ...
Front power seat lumbar switch
Inspection
1. INSPECT FRONT POWER SEAT LUMBAR SWITCH
Measure the resistance according to the value(s) in
the table below.
Standard resistance
If the result is not as specified, replace the switch. ...
Message Settings
Display the “Phone/Message Settings” screen.
Select “Messaging Settings”.
Select the desired item to be set.
Set automatic message
transfer on/off.
Set automatic message
readout on/off.
Set the SMS/MMS notification
popup on/off.
Set the e-mail notification
pop ...
