Toyota Sienna Service Manual: Removal
1. REMOVE TRANSFER CASE NO.1 PLUG (See page TF-8)
2. REMOVE TRANSFER DRAIN PLUG
(a) Remove the transfer drain plug, drain gasket and bleed transfer oil.
3. REMOVE EXHAUST PIPE ASSEMBLY
HINT: (See page EX-8)
4. REMOVE PROPELLER WITH CENTER BEARING SHAFT ASSEMBLY
HINT: (See page PR-3)
5. REMOVE TRANSFER EXTENSION HOUSING TYPE T OIL SEAL
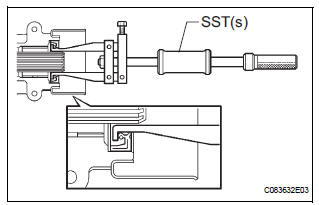
(a) Using SST(s), remove the transfer extension housing type T oil seal from the transfer extension housing sub- assembly.
SST 09308-00010
NOTICE: Be careful not to damage the oil-seal-fitted surface and the inside surface of the bush.
 Extension housing oil seal
COMPONENTS
...
 Installation
1. INSTALL TRANSFER EXTENSION HOUSING TYPE T OIL SEAL
(a) Using SST(s), install anew transfer extension
housing type T oil seal to he transfer extension
housing sub-assembly at the position sho ...
Other materials:
Diagnosis system
1. CHECK DLC3
The vehicle's ECU uses ISO 15765-4 for
communication protocol. The terminal arrangement
of the DLC3 complies with SAE J1962 and matches
the ISO 15765-4 format
NOTICE:
*: Before measuring the resistance, leave the
vehicle as is for at least 1 minute and do not
oper ...
If your vehicle overheats
The following may indicate that your vehicle is overheating.
The needle of the engine coolant temperature gauge
enters the red zone or a loss of engine power is experienced. (For
example, the vehicle speed does not increase.)
The warning message indicating overheats is shown on the
mult ...
Air conditioning
SST
RECOMMENDED TOOLS
HINT:
Torx is a registered trademark of Textron Inc.
EQUIPMENT
LUBRICANT
SUPPLEMENTAL RESTRAINT SYSTEM
SST
RECOMMENDED TOOLS
HINT:
Torx is a registered trademark of Textron lnc.
EQUIPMENT
SEAT BELT
SST
RECOMMENDED TOOLS
EQUIPMENT
THEFT ...
