
Toyota Sienna Service Manual: Sensor signal check by test mode (signal check) (when using intelligent tester)
(a) When having replaced the skid control ECU and/or yaw rate and deceleration sensor, perform zero point calibration of the yaw rate and deceleration sensor.
HINT:
- If the ignition switch is turned from the ON position to the ACC or off during test mode (signal check), DTCs of the signal check function will be erased.
- During test mode (signal check), the skid control ECU records all DTCs of the signal check function. By performing the test mode (signal check), the codes are erased if normality is confirmed. The remaining codes are the codes where an abnormality was found.
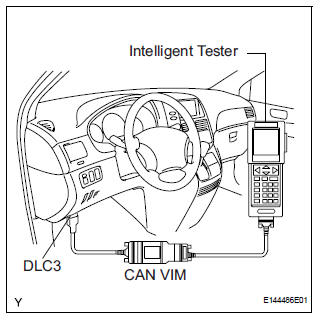
(b) Procedures for test mode.
(1) Turn the ignition switch off.
(2) Connect the intelligent tester to the DLC3.
(3) Check that the steering wheel is in the straight ahead position and move the shift lever to the P position.
(4) Turn the ignition switch to the ON position.
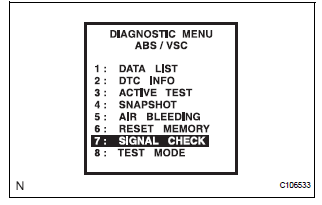
(5) Set the intelligent tester to test mode (select "SIGNAL CHECK").
HINT: Refer to the intelligent tester operator's manual for further details.
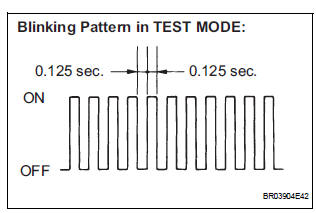
(6) Check that the ABS warning light and VSC warning light blink (test mode).
HINT:
If the ABS warning light and VSC warning light
do not blink, inspect the ABS warning light circuit
and/or VSC warning light circuit. 
 Warning light and indicator light bulb check
(a) Check the warning lights.
(1) Release parking brake pedal.
(2) When the ignition switch is turned to the ON
position, check that the ABS warning light,
BRAKE warning light, VSC warning ...
 Master cylinder pressure sensor check (when using intelligent tester)
(a) Leave the vehicle in a stationary condition and
release the brake pedal for 1 second or more, and
quickly depress the brake pedal with a force of 98 N
(10 kgf, 22 lbf) or more for 1 second or m ...
Other materials:
License plate light assembly
COMPONENTS
REMOVAL
1. REMOVE BACK DOOR GARNISH CENTER
2. REMOVE BACK DOOR SIDE GARNISH LH
3. REMOVE BACK DOOR SIDE GARNISH RH
4. REMOVE BACK DOOR STRAP COVER
5. REMOVE BACK DOOR PULL STRAP
6. REMOVE BACK DOOR TRIM BOARD ASSEMBLY
7. REMOVE BACK DOOR GARNISH SUB-ASSEMBLY OUTSIDE
8. RE ...
CD Sound Skips
INSPECTION PROCEDURE
1 CHECK CD
Check the CD.
OK:
The CD is clean.
HINT:
If dirt is on the CD surface, wipe it clean with a soft cloth
from the inside to the outside in a radial direction.
NOTICE:
Do not use a conventional record cleaner or antistatic
preservative.
2 CHECK CD
...
Window glass antenna wire
INSPECTION
1. INSPECT WINDOW GLASS ANTENNA WIRE
Inspect the wind glass antenna wire.
NOTICE:
When cleaning the glass, use a soft, dry cloth,
and wipe the glass in the direction of the wire.
Take care not to damage the wires. Do not use
detergents or glass cleaners with abrasiv ...
