Toyota Sienna Service Manual: Slide Door Closer RH does not Operate
DESCRIPTION
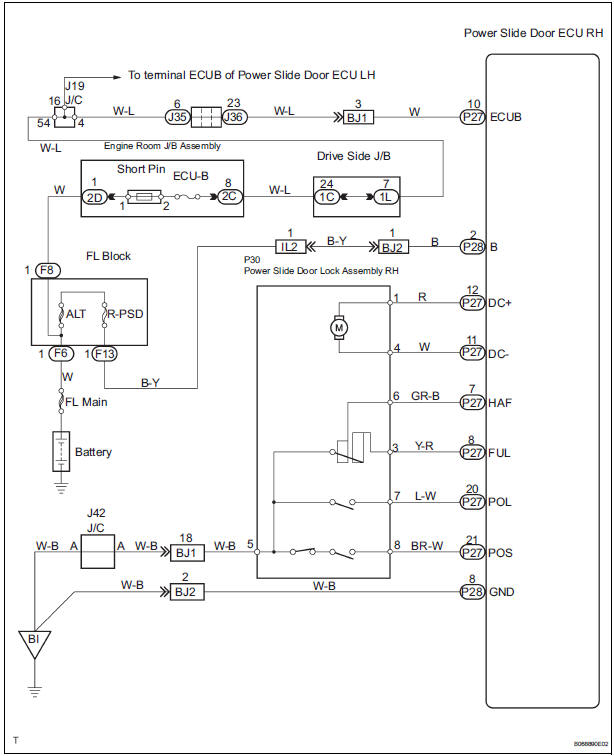
The slide door ECU RH controls the slide door closer. In response to the signals output from the switches in the slide door lock, the slide door closer drives the closer motor.
HINT: The slide door closer system operates regardless of the power slide door main switch ON / OFF.
WIRING DIAGRAM
INSPECTION PROCEDURE
1 INSPECT FUSE (ECU-B)
- Inspect the ECU-B fuse
2 INSPECT SLIDE DOOR LOCK
- Check that the slide door fully closes (fully locked) when the door is closed by hand.
3 POWER SOURCE RESET
- Disconnect the ECU-B fuse and reconnect it. 10 seconds later, check that the back door closer is operational.
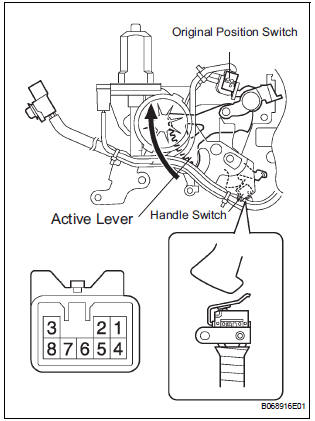
4 INSPECT POWER SLIDE DOOR LOCK ASSEMBLY RH
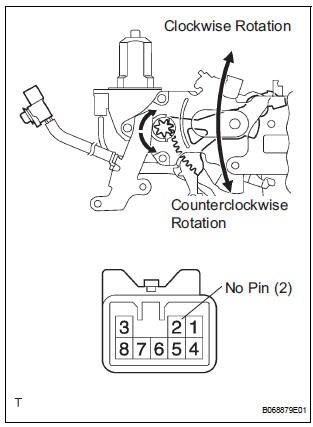
- Apply battery voltage to the terminals and check the motor operation.
OK
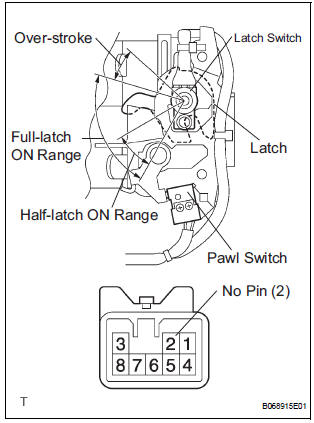
- At each range of the latch, inspect the resistance of the pawl switch and latch switch.
Resistance
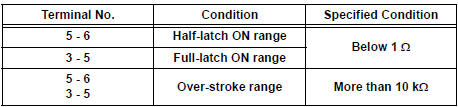
- Inspect the resistance of the original position switch and handle switch.
Resistance

5 CHECK WIRE HARNESS (POWER SLIDE DOOR LOCK ASSEMBLY RH - POWER SLIDE DOOR ECU RH)
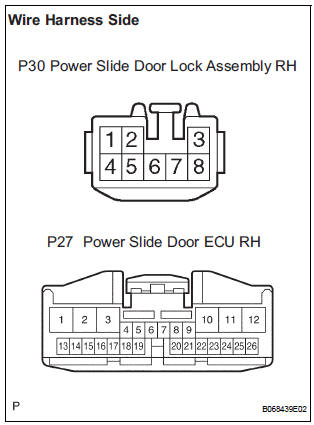
- Disconnect the P30 door lock and P27 ECU connectors.
- Check the resistance between the wire harness connectors.
Resistance (Check for open circuit)

- Check the resistance between the P30 lock connector and body ground.
Resistance (Check for open circuit)

REPLACE POWER SLIDE DOOR ECU RH
 Slide Door Closer LH does not Operate
DESCRIPTION
The slide door ECU LH controls the slide door closer. In response to the
output signals from the switches
in the slide door lock, the slide door closer drives the closer motor.
HINT:
...
 Back door closer system
PARTS LOCATION
...
Other materials:
Short to GND in Front Pretensioner Squib RH
Circuit
DTC B0132/61 Short to GND in Front Pretensioner Squib RH
Circuit
DESCRIPTION
The front pretensioner squib RH circuit consists of the center airbag sensor
assembly and the front seat
outer belt assembly RH.
This circuit instructs the SRS to deploy when deployment conditions are met.
DTC B ...
Check mode procedure
1. CHECK MODE (SIGNAL CHECK): DTC CHECK
Connect the intelligent tester to the DLC3.
Turn the ignition switch to the ON position.
Select the "SIGNAL CHECK", and proceed
checking using the intelligent tester.
NOTICE:
Select the "SIGNAL CHECK" from the ...
Short to B+ in Curtain Shield Squib LH Circuit
DTC B1168/86 Short to B+ in Curtain Shield Squib LH Circuit
DESCRIPTION
The curtain shield squib LH circuit consists of the center airbag sensor
assembly and the curtain shield
airbag assembly LH.
The circuit instructs the SRS to deploy when deployment conditions are met.
DTC B1168/86 is ...
