
Toyota Sienna Service Manual: AVC-LAN Circuit
DESCRIPTION
Each unit of the navigation system connected to the AVC-LAN (communication bus) transfers the signal of each switch by communication.
When a short to +B or short to ground occurs in this AVC-LAN, the navigation system will not function normally as the communication is discontinued.
INSPECTION PROCEDURE
1 INSPECT RADIO AND NAVIGATION ASSEMBLY
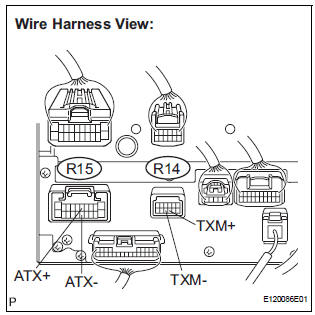
- Disconnect the radio and navigation assembly connectors.
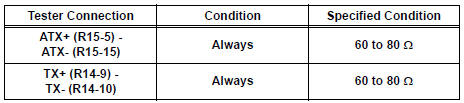
- Measure the resistance according to the value(s) in the table below.
Standard resistance
2 CHECK HARNESS AND CONNECTOR
HINT: For details of the connectors, refer to "TERMINALS OF ECU".
- Referring to the AVC-LAN wiring diagram below, check all AVC-LAN circuits.
- Check for an open or short in all AVC-LAN circuits.
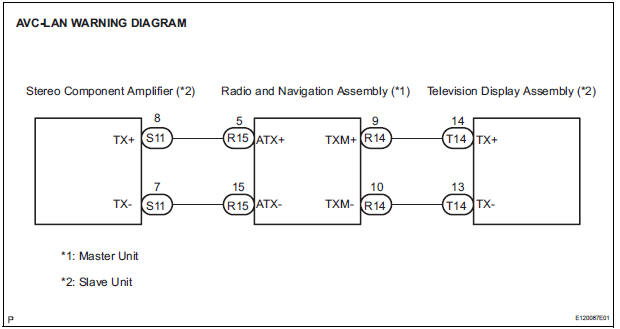
OK: There is no open or short circuit.
PROCEED TO NEXT CIRCUIT INSPECTION SHOWN IN PROBLEM SYMPTOMS TABLE
 Mute Signal Circuit between Radio and Navigation Assembly and
Stereo Component Amplifier
Mute Signal Circuit between Radio and Navigation Assembly and
Stereo Component Amplifier
DESCRIPTION
This circuit sends a signal to the stereo component amplifier to mute noise.
Because of that, the noise
produced by changing the sound source ceases.
If there is an open in the circ ...
 Reverse Signal Circuit
DESCRIPTION
The radio and navigation assembly receives a reverse signal from the
park/neutral position switch and
information about the GPS antenna, and then adjusts vehicle position.
WIRING DIAG ...
Other materials:
Removal
1. REMOVE CHARCOAL CANISTER PROTECTOR
(a) Remove the 6 bolts and charcoal canister protector.
2. REMOVE CHARCOAL CANISTER ASSEMBLY
(a) Disconnect the fuel tank vent hose from the
charcoal canister.
(1) Push the connector deep inside.
(2) Pinch portion A.
(3) Pull out the connector.
...
Dtc check / clear
1. DTC CHECK (USING SST CHECK WIRE)
(a) Check DTCs.
(1) Turn the ignition switch off.
(2) Using SST, connect terminals TC and CG of
DLC3.
SST 09843-18040
(3) Turn the ignition switch to the ON position.
(4) Read and record any DTCs from the tire
pressure warning light on the combin ...
Map Disc cannot be Inserted
INSPECTION PROCEDURE
1 CHECK RADIO AND NAVIGATION ASSEMBLY
Check if a disc is inserted into the MAP disc slot.
Check if "DISC IN" is displayed.
OK:
"DISC IN" is displayed
2 CHECK MAP DISC
Check that the map disc is not deformed or cracked.
OK: ...
