Toyota Sienna Service Manual: Charge Warning Light Comes ON while Driving
INSPECTION PROCEDURE
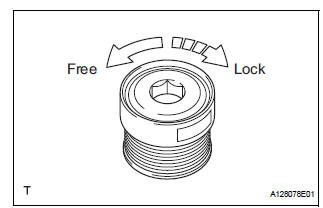
1 CHECK LOCK FUNCTION OF CLUTCH PULLEY
(a) Check the lock function with the pulley installed in the vehicle.
(1) Visually check that the rotor in the generator operates with the engine started.
(b) Check the lock function with the pulley removed from the vehicle.
(1) Remove the generator pulley cap. Using SST, hold the generator rotor.
(2) Turn the clutch pulley clockwise and check that the outer ring locks.
OK: The outer ring locks.
SST 09820-63020


2 CHECK LOCK OF CLUTCH PULLEY
(a) Start the engine and visually check for looseness of the clutch pulley.
OK: The clutch pulley is not loose.


REPLACE GENERATOR ASSEMBLY
 On-vehicle inspection
1. Check battery electrolyte level
(a) Check the electrolyte level.
(1) If the electrolyte level is low, replace the battery
(or add distilled water) and check the charging
system.
2. CHECK BAT ...
 Noise Occurs from Generator while Engine is Running
INSPECTION PROCEDURE
1 CHECK LOOSENESS OF V-RIBBED BELT
(a) Check the tension of the belt by pushing it down with a
finger.
OK:
The tension of the belt is enough.
2 CHECK V-RIBBED BELT FOR W ...
Other materials:
Occupant Classification ECU Malfunction
DTC B1795 Occupant Classification ECU Malfunction
DESCRIPTION
DTC B1795 is recorded when a malfunction is detected in the occupant
classification ECU.
Troubleshoot DTC B1771 first when the DTCs B1771 and B1795 are output
simultaneously.
WIRING DIAGRAM
INSPECTION PROCEDURE
1 CHECK DTC ...
Rear Air Mix Damper Position Sensor Circuit
DESCRIPTION
This sensor detects the position of the rear air mix control servo motor
(water valve servo motor) and
sends the appropriate signals to the A/C amplifier. The position sensor is built
in the rear air mix control
servo motor (water valve servo motor).
The position sensor's r ...
Short to B+ in Front Passenger Side Squib 2nd
Step Circuit
DTC B1188/56 Short to B+ in Front Passenger Side Squib 2nd
Step Circuit
DESCRIPTION
The front passenger side squib 2nd step circuit consists of the center airbag
sensor assembly and the
front passenger airbag assembly.
The circuit instructs the SRS to deploy when deployment conditions are m ...
