Toyota Sienna Service Manual: Coolant
Replacement
1. REMOVE NO. 1 ENGINE UNDER COVER (See page EM-26) 2. REMOVE V-BANK COVER SUB-ASSEMBLY (See page EM-28) 3. DRAIN ENGINE COOLANT
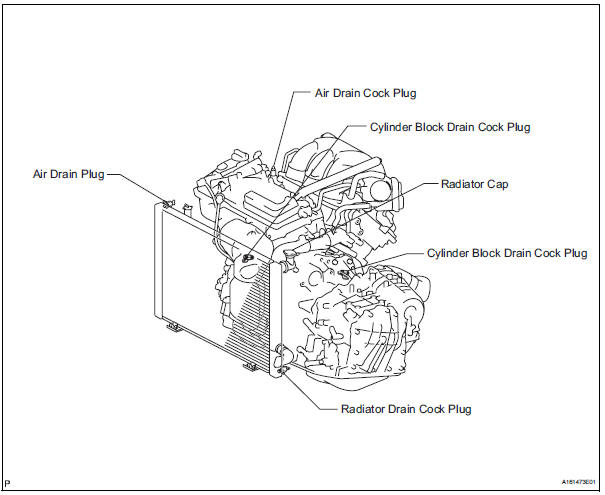
(a) Loosen the radiator drain cock plug.
HINT: Collect the coolant in a container and dispose of it according to the regulations in your area.
(b) Remove the radiator cap sub-assembly from the radiator assembly.
| NOTICE:
Do not remove the radiator cap sub-assembly
while the engine and radiator are still hot.
Pressurized, hot engine coolant and steam may be released and cause serious burns. |
(c) Loosen the 2 cylinder block drain cock plugs.
4. ADD ENGINE COOLANT
(a) Tighten the radiator drain cock plug by hand.
(b) Tighten the 2 cylinder block drain cock plugs.
Torque: 13 N*m (130 kgf*cm, 9 ft.*lbf) for cylinder block drain cock plugs (c) Remove the air drain cock plug from the water inlet housing.
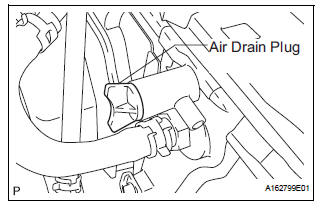
(d) Loosen the air drain plug at the top of the radiator 3 or 4 turns.
(e) Add TOYOTA Super Long Life Coolant (SLLC) to the radiator inlet opening until coolant overflows from the engine air drain cock hole. Then install the air drain cock plug to the water inlet housing.
Torque: 13 N*m (130 kgf*cm, 9 ft.*lbf) for air drain cock plug (f) Continue to add TOYOTA Super Long Life Coolant (SLLC) to the radiator inlet opening until coolant overflows from the radiator air drain hole. Then close the air drain plug at the top of the radiator.
HINT: If the coolant level at the radiator inlet opening drops after squeezing the No. 1 and No. 2 radiator hoses, add coolant.
(g) Slowly fill the radiator with TOYOTA Super Long Life Coolant (SLLC).
Standard capacity: 11.3 liters (12.0 US qts, 10.0 Imp. qts)
HINT:
- TOYOTA vehicles are filled with TOYOTA SLLC at the factory. In order to avoid damage to the engine cooling system and other technical problems, only use TOYOTA SLLC or similar high quality ethylene glycol based non-silicate, non-amine, non-nitrite, non-borate coolant with long-life hybrid organic acid technology (coolant with long-life hybrid organic acid technology consists of a combination of low phosphates and organic acids).
- Contact your TOYOTA dealer for further details.
| NOTICE: Never use water as a substitute for engine coolant. |
(h) Slowly pour coolant into the radiator reservoir tank until it reaches the FULL line.
(i) Squeeze the No. 1 and No. 2 radiator hoses several times by hand, and then check the level of the coolant.
If the coolant level is low, add coolant.
(j) Bleed air from the cooling system.
(1) Warm up the engine until the thermostat opens.
While the thermostat is open, circulate the coolant for several minutes.
HINT: The thermostat open timing can be confirmed by squeezing the inlet radiator hose by hand, and checking when the engine coolant starts to flow inside the hose.
(2) Maintain the engine speed at 2500 to 3000 rpm.
(3) Squeeze the inlet and outlet radiator hoses several times by hand to bleed air.
| CAUTION: When squeezing the radiator hoses:
|
NOTICE:
|
(k) Stop the engine and wait until the engine coolant cools down.
(l) Add engine coolant to the FULL line on the radiator reservoir.
5. INSPECT FOR COOLANT LEAK (See page CO-1) 6. INSTALL V-BANK COVER SUB-ASSEMBLY (See page EM-63) 7. INSTALL NO. 1 ENGINE UNDER COVER (See page EM-63)
 On-vehicle inspection
1. INSPECT COOLING FAN SYSTEM
(a) Put the vehicle in the following conditions
(1) The engine switch is off.
(2) The coolant temperature is less than 95°C
(203°F).
(3) The battery voltage is ...
 Water pump
COMPONENTS
...
Other materials:
Installation
1. INSTALL HEATED OXYGEN SENSOR (for Bank 2
Sensor 2)
(a) Using SST, install the heated oxygen sensor to the
front exhaust pipe.
SST 09224-00010
Torque: 40 N*m (408 kgf*cm, 30 ft.*lbf) for use
with SST
44 N*m (449 kgf*cm, 32 ft.*lbf) for use
without SST
HINT:
Use a torque wrench wit ...
Voice Recognition Difficulty
INSPECTION PROCEDURE
1 CHECK CONDITION
Check if the system's voice recognition level is low by
using only one particular voice.
OK:
System's voice recognition level is low with any
voice.
2 CHECK MAP DISC
Check that the map disc is not deformed or cracked.
OK:
No deformation ...
System description
1. OUTLINE
As a unique feature of Rear Seat Entertainment
(RSE) system, the front and rear seat occupants can
enjoy different audio-visual modes at the same time.
Thus, this system offers enhanced entertainment to
the rear seat occupants.
The rear seat occupants can control the ...
