
Toyota Sienna Service Manual: Cooling fan motor
On-vehicle inspection
1. No. 1 Cooling fan motor
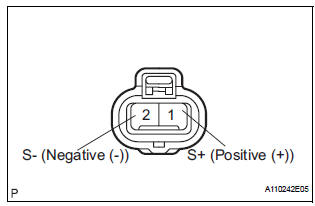
(A) check that the motor turns smoothly when the battery is connected to the fan motor connector.
(B) measure the current while the motor is turning.
Standard current: 11.8 To 14.8 A at 20°c (68°f) if the result is not as specified, replace the no. 1 Cooling fan motor.
2. NO. 2 COOLING FAN MOTOR
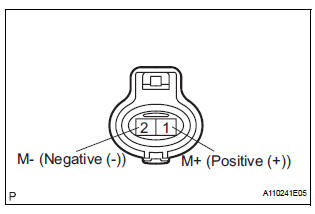
(a) Check that the motor turns smoothly when the battery is connected to the fan motor connector.
(b) Measure the current while the motor is turning.
Standard current: 9 to 11 A at 20°C (68°F) If the result is not as specified, replace the No. 2 cooling fan motor.
 Installation
1. Install thermostat
(a) Install a new gasket to the thermostat.
(b) Install the thermostat with the jiggle valve facing up.
Hint:
the jiggle valve may be set within 10° on either side
of ...
 Cooling fan ecu
ON-VEHICLE INSPECTION
1. INSPECT COOLING FAN ECU
(a) Inspect the input voltage.
(1) Disconnect the cooling fan ECU connector.
(2) Turn the ignition switch to the ON position.
Check the ...
Other materials:
Repair
1. INTRODUCTION
(a) This section introduces ways to determine whether
the run-flat tire is repairable or not. Repair must be
performed by following the appropriate procedures.
If a flat tire occurs, it is possible to drive a maximum
of 160 km (100 miles) at a speed below 90 km/h (55
mph) due ...
Removal
1. RECOVER REFRIGERANT FROM REFRIGERATION
SYSTEM (See page AC-172)
2. REMOVE FRONT WIPER ARM HEAD CAP (See page
WW-4)
3. REMOVE FRONT WIPER ARM RH (See page WW-4)
4. REMOVE FRONT WIPER ARM LH (See page WW-4)
5. REMOVE COWL TOP VENTILATOR LOUVER SUBASSEMBLY
(See page WW-4)
6. REMOVE WINDSHIEL ...
Voice is not Recognized
INSPECTION PROCEDURE
1 CHECK NAVIGATION SETTINGS
Enter the "Menu" screen by pressing the "MENU" switch.
Select "Setup
Check that "Voice Recognition Guidance" is not OFF.
OK:
Voice Recognition Guidance is not OFF.
2 CHECK MAP DISC
...
