
Toyota Sienna Service Manual: Definition of terms
| Term | Definition |
| Monitor description | Description of what the ecm monitors and how it detects malfunctions (monitoring purpose and its details). |
| Related dtcs | Diagnostic codeV |
| Typical enabling condition | Preconditions that allow the ecm to detect malfunctions.
With all preconditions satisfied, the ecm sets the dtc when the monitored value(s) exceeds the malfunction threshold(s). |
| Sequence of operation | The priority order that is applied to monitoring, if multiple
sensors and components are used to detect the
malfunction.
While another sensor is being monitored, the next sensor or component will not be monitored until the previous monitoring has concluded. |
| Required sensor/components | The sensors and components that are used by the ecm to detect malfunctions. |
| Frequency of operation | The number of times that the ecm checks for malfunctions
per driving cycle.
"Once per driving cycle" means that the ecm detects malfunction only one time during a single driving cycle. "Continuous" means that the ecm detects malfunction every time when enabling condition is met. |
| Duration | The minimum time that the ecm must sense a continuous deviation in the monitored value(s) before setting a dtc. This timing begins after the "typical enabling conditions" are met. |
| Malfunction thresholds | Beyond this value, the ecm will conclude that there is a malfunction and set a dtc. |
| MIL operation | Mil illumination timing after a defect is detected.
"Immediately" means that the ecm illuminates mil the instant the ecm determines that there is a malfunction. "2 Driving cycle" means that the ecm illuminates mil if the same malfunction is detected again in the 2nd driving cycle. |
| Component operating range | Normal operation range of sensors and solenoids under normal driving
conditions.
Use these ranges as a reference. They cannot be used to judge if a sensor or solenoid is defective or not.V |
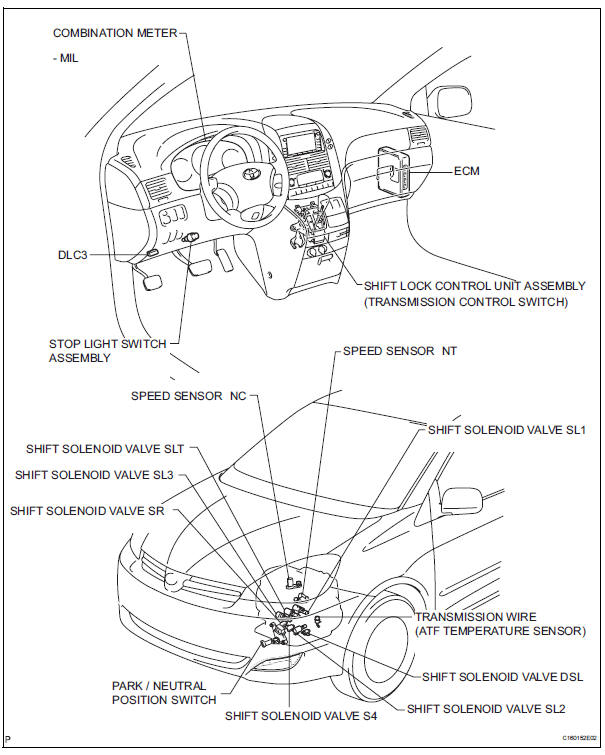
Parts location
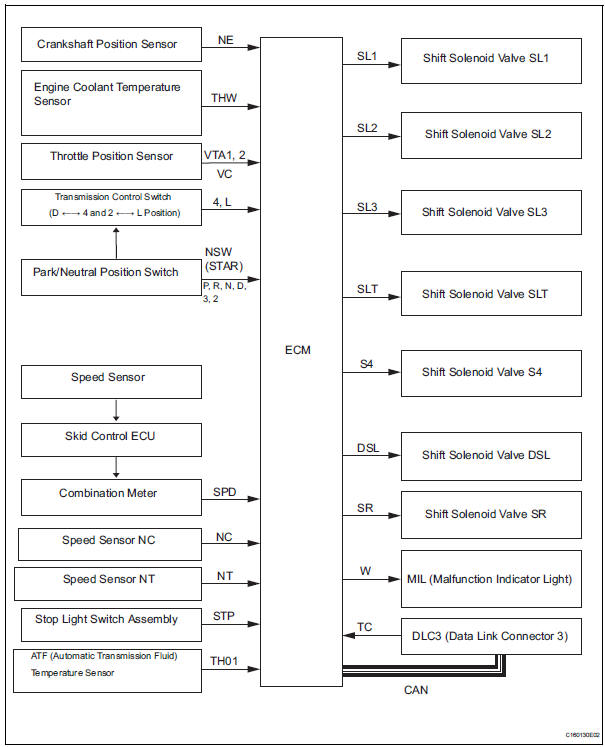
System diagram
The configuration of the electronic control system in the U151E automatic transaxles is as shown in the following chart.
 Precaution
NOTICE:
Perform the RESET MEMORY (AT initialization) when
replacing the automatic transaxle assembly, engine
assembly or ECM (See page AX-16).
Perform the REGISTRATION (VIN regi ...
 System description
1. SYSTEM DESCRIPTION
(a) The ECT (Electronic controlled automatic
transmission/transaxle) is an automatic
transmission/transaxle that electronically controls
shift timing using the ECM. The ECM d ...
Other materials:
Installation
1. INSTALL TRANSAXLE HOUSING OIL SEAL
(a) Using SST and a hammer, install a new oil seal.
SST 09316-60011 (09316-00011)
Oil seal installation depth:
-0.5 to 0.5 mm (-0.020 to 0.020 in.)
(b) Coat the lip of the oil seal with MP grease.
2. INSTALL DIFFERENTIAL SIDE BEARING RETAINER OIL SEA ...
Power Back Door Warning Buzzer does not Sound
DESCRIPTION
The power back door system uses a warning buzzer built into the
back door, which has 3 ways of
sounding that are used differently according to the situations:
When all the following conditions are met, the warning buzzer sounds at
a cycle of 0.3 seconds:
* The ignitio ...
Diagnostic trouble code chart
HINT:
If a trouble code is displayed during the DTC check, inspect
the circuit listed for that code. For details of each code, refer
to the relevant page listed under respective "DTC No." in the
DTC chart.
TIRE PRESSURE WARNING SYSTEM:
...
