Toyota Sienna Service Manual: Disassembly
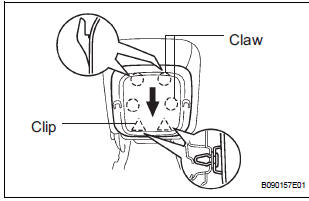
1. REMOVE FRONT SEAT SIDE TABLE LEG COVER (w/ Table)
- Using a screwdriver, disengage the claws and remove the seat side table leg cover.
HINT: Tape the screwdriver tip before use.
2. REMOVE FRONT SEAT SIDE TABLE (w/ Table)
- Remove the 4 nuts and seat side table.
- Remove the 2 clips and seat side table cover.
3. REMOVE OCCUPANT CLASSIFICATION ECU (for Front Passenger Seat)
4. REMOVE VERTICAL SEAT ADJUSTER KNOB (for Driver Seat)
- Using a scraper, disengage the claws and remove
the vertical seat adjuster knob cover.
HINT: Tape the screwdriver tip before use.
- Remove the screw and the vertical seat adjuster knob.
5. REMOVE RECLINING ADJUSTER RELEASE HANDLE LH
- Using a screwdriver, disengage the claws and remove the reclining adjuster release handle.
HINT: Tape the screwdriver tip before use.
6. REMOVE FRONT SEAT CUSHION SHIELD LH
- Remove the screw.
- Using a screwdriver, disengage the claws and remove the cushion shield.
HINT: Tape the screwdriver tip before use.
7. REMOVE FRONT SEAT INNER BELT ASSEMBLY LH
- Disconnect the connectors.
- Remove the nut and inner belt assembly.
8. REMOVE FRONT SEAT CUSHION SHIELD INNER LH
- Remove the screw.
- Using a screwdriver, disengage the claws and remove the cushion shield.
HINT: Tape the screwdriver tip before use.
9. REMOVE FRONT SEAT TRACK COVER LH FRONT OUTER
- Remove the clip, 2 screws and seat track cover front outer.
10. REMOVE FRONT SEAT TRACK COVER LH FRONT INNER
- Remove the clip, 2 screws and seat track cover front inner.
11. REMOVE FRONT SEAT INNER LH ARMREST ASSEMBLY
- Using a screwdriver, remove the armrest cap.
HINT: Tape the screwdriver tip before use.
- Remove the bolt and armrest.
- Remove the 2 washers and 2 spacers.
12. REMOVE SEAT CUSHION COVER WITH PAD
- Disengage the clamps and hooks.
- Disengage the hooks and remove the seat cushion cover with pad.
13. REMOVE SEPARATE TYPE FRONT SEAT CUSHION COVER
- Remove the hog rings and the separate type front seat cushion cover.
14. REMOVE FRONT SEATBACK BOARD LH
- Disengage the clips.
- Remove the seatback board by pulling it out in the arrow mark direction shown in the illustration.
15. REMOVE LUMBAR SUPPORT KNOB LH (for Driver Seat)
- Using a shop rag, remove the snap ring and lumbar support knob.
16. REMOVE FRONT SEAT HEADREST SUPPORT
- Disengage the claw and remove the 2 headrest supports.
17. REMOVE SEATBACK COVER WITH PAD

- with Side airbag: Remove the nut and disengage the separate type front seatback cover bracket.
- Remove the hog rings and disengage the hooks.
- Remove the seatback cover with pad.
18. REMOVE FRONT SEATBACK COVER LH
- Remove the hog rings and the front seatback cover.
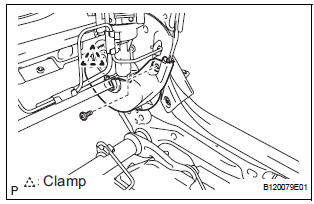
19. REMOVE RECLINING ADJUSTER INSIDE COVER LH
- Disengage the clamp.
- Remove the screw and the reclining adjuster inside cover LH (lower).
20. REMOVE RECLINING ADJUSTER INSIDE COVER RH
HINT: Use the same procedures for the RH side and LH side.
21. REMOVE RECLINING ADJUSTER INSIDE COVER LH
- Remove the screw and the reclining adjuster inside cover LH (upper).
22. REMOVE RECLINING ADJUSTER INSIDE COVER RH
HINT: Use the same procedures for the RH side and LH side.
23. REMOVE FRONT SEAT CUSHION SHIELD LOWER LH
- Remove the screw and the front seat cushion shield lower LH.
24. REMOVE FRONT SEAT CUSHION SHIELD LOWER RH
HINT: Use the same procedures for the RH side and LH side.
25. REMOVE SEAT POSITION AIRBAG SENSOR (for Driver Seat)
 Removal
CAUTION:
Wear safety gloves, because the sharp surfaces of the
seatback frame and seat adjuster may injure your
hand.
Work must be started more than 90 seconds after the
igniti ...
 Reassembly
1. INSTALL SEAT POSITION AIRBAG SENSOR (for Driver Seat)
2. INSTALL FRONT SEAT CUSHION SHIELD LOWER LH
Install the front seat cushion shield lower LH with
the screw.
3. INSTALL FRONT S ...
Other materials:
Manual Up / Down Function does not Operate on Rear LH Only
DESCRIPTION
If the manual UP/DOWN function does not operate, the power window motor, the
regulator switch or the
wire harness may be malfunctioning.
WIRING DIAGRAM
INSPECTION PROCEDURE
1 CHECK WIRE HARNESS (POWER SOURCE)
Disconnect the P38 regulator switch connector.
Turn ...
Disposal
HINT:
Use the same procedures for the RH side and LH side.
The procedures listed below are for the LH side.
When scrapping a vehicle equipped with the SRS or
disposing of the front seat side airbag assembly, be sure to
deploy the airbag first in accordance with the proc ...
Short to B+ in Driver Side Squib Circuit
DTC B0103/12 Short to B+ in Driver Side Squib Circuit
DESCRIPTION
The driver side squib circuit consists of the center airbag sensor assembly,
the spiral cable and the
steering pad.
The circuit instructs the SRS to deploy when deployment conditions are met.
DTC B0103/12 is recorded when a ...
