Toyota Sienna Service Manual: Inspection
1. INSPECT FRONT STABILIZER LINK ASSEMBLY LH
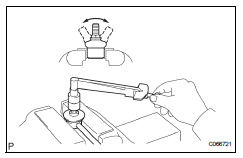
(a) As shown in the illustration, flip the ball joint stud back and forth 5 times, before installing the nut.
(b) Using a torque wrench, turn the nut continuously at a rate of 2 to 4 seconds per 1 turn and take the torque reading on the 5th turn.
Turning torque: 0.05 to 1.96 N*m (0.5 to 20kgf*cm, 0.4 to 17.4 in.*lbf)
 Removal
1. REMOVE FRONT WHEELS
2. REMOVE FRONT STABILIZER LINK ASSEMBLY LH
(a) Remove the 2 nuts and front stabilizer link assembly
LH.
HINT:
If the ball joint turns together with the nut, use a
hex ...
 Installation
1. INSTALL STABILIZER BAR FRONT
2. INSTALL FRONT STABILIZER BAR BUSH NO.1
(a) Install the front stabilizer bar bush No. 1.
HINT:
Install the bushing to the outer side of the bushing
stopper o ...
Other materials:
Inspection
1. V
(a) Inspect VSV operation.
(1) Using an ohmmeter, measure the resistance
according to the value(s) in the table below.V
Standard resistance
If the result is not as specified, replace the
vsv.
(B) inspect the vsv for ground.
(1) Using an ohmmeter, measure the resistance
accordin ...
Disassembly
1. REMOVE RETURN TUBE NO.2
(a) Using SST, remove the return tube No. 2.
SST 09023-12701
2. REMOVE STEERING LEFT TURN PRESSURE TUBE
(a) Using SST, remove the left turn pressure tube.
SST 09023-38201
(b) Remove the 2 O-rings from the left turn pressure
tube.
3. REMOVE STEERING RIGH ...
Installation
1. INSTALL SEAT POSITION AIRBAG SENSOR
Check that the ignition switch is off.
Check that the negative battery (-) terminal is
disconnected.
CAUTION:
After disconnecting the negative battery
terminal, wait for at least 90 seconds before
starting the operation.
Usin ...
