Toyota Sienna Service Manual: Inspection
1. INSPECT FRONT STABILIZER LINK ASSEMBLY LH
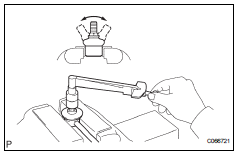
(a) As shown in the illustration, flip the ball joint stud back and forth 5 times, before installing the nut.
(b) Using a torque wrench, turn the nut continuously at a rate of 2 to 4 seconds per 1 turn and take the torque reading on the 5th turn.

Turning torque: 0.05 to 1.96 N*m (0.5 to 20 kgf*cm, 0.4 to 17.4 in.*lbf)
 Removal
1. REMOVE FRONT WHEELS
2. REMOVE FRONT STABILIZER LINK ASSEMBLY LH
HINT:
(See page SP-26)
3. REMOVE FRONT STABILIZER LINK ASSEMBLY RH
HINT:
Remove the RH side by the same procedures as the LH
s ...
 Installation
1. INSTALL FRONT STABILIZER BAR
2. INSTALL NO. 1 FRONT STABILIZER BAR BUSHING
(a) Install the 2 front stabilizer bar bush No.1 to the
stabilizer bar front.
NOTICE:
Install the bushings with t ...
Other materials:
Front wheel alignment
Adjustment
NOTICE:
For vehicles equipped with VSC, if wheel alignment has
been adjusted, and if suspension or underbody
components have been removed/installed or replaced, be
sure to perform the following initialization procedure in
order for the system to function normally:
1. Disconnect the ...
Sound Signal Circuit between Radio and Navigation Assembly and
Stereo Component Amplifier
DESCRIPTION
The radio and navigation assembly sends a sound signal to the stereo
component amplifier through this
circuit.
The sound signal that has been sent is amplified by the stereo component
amplifier, and then is sent to
the speakers.
If there is an open or short in the circuit, s ...
How to proceed with
troubleshooting
HINT:
Troubleshooting of the wireless door lock control system is
based on the premise that the power door lock system, the
power slide door system, the power back door system and
the power window system are operating normally.
Therefore, before troubleshooting the wireless door lo ...
