
Toyota Sienna Service Manual: Installation
1. INSTALL BRAKE MASTER CYLINDER
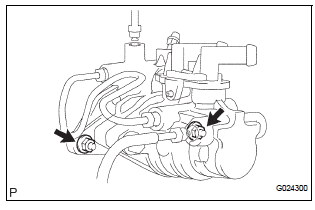
(a) Install the brake master cylinder with the 2 nuts.
Torque: 13 N*m (130 kgf*cm, 9 ft.*lbf) (b) Slide the clip and connect the brake master cylinder reservoir hose.
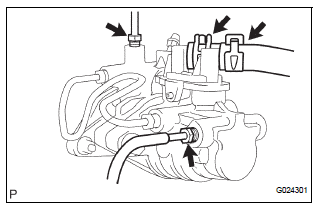
(c) Using SST, connect the 2 brake tube to the brake master cylinder.
SST 09023-00101 Torque: 15 N*m (155 kgf*cm, 11 ft.*lbf)
2. INSTALL AIR CLEANER ASSEMBLY WITH HOSE
3. FILL RESERVOIR WITH BRAKE FLUID (See page BR- 3)
4. BLEED BRAKE MASTER CYLINDER (See page BR-3)
5. BLEED BRAKE LINE (See page BR-4)
6. BLEED BRAKE ACTUATOR (w/ VSC) (See page BR- 4)
7. CHECK BRAKE FLUID LEVEL IN RESERVOIR (See page BR-7)
8. CHECK BRAKE FLUID LEAKAGE
9. INSTALL COWL TOP PANEL SUB-ASSEMBLY OUTER FRONT
10. INSPECT BRAKE PEDAL HEIGHT (See page BR-9)
11. CHECK BRAKE ACTUATOR WITH INTELLIGENT
TESTER 
 Reassembly
1. INSTALL BRAKE MASTER LESS RESERVOIR TANK CYLINDER SUB-ASSEMBLY
(a) Apply lithium soap base glycol grease to the 2 brake
master cylinder union grommets and install them to
the brake master less r ...
 Brake booster
COMPONENTS
...
Other materials:
Reassembly
1. INSTALL SHOCK ABSORBER ASSEMBLY FRONT LH
2. INSTALL FRONT COIL SPRING INSULATOR LOWER
LH
(a) Install the front coil spring insulator lower LH onto
the shock absorber assembly front LH.
3. INSTALL FRONT SPRING BUMPER LH
(a) Install the front spring bumper LH to the piston rod.
4. INSTALL FR ...
Opening and closing
Front moon roof
Vehicles without a rear moon
roof
Vehicles with a rear moon roof
Opens the moon roof*
The moon roof will stop at the tilt up position once.
To tilt down, press the opposite side of the switch.
Press the switch again to open.
Closes the moon roof*
...
Installation
1. INSTALL LOWER BALL JOINT ASSEMBLY FRONT LH
(a) Install the lower ball joint assembly front LH and
tighten the nut.
Torque: 123 N*m (1,250 kgf*cm, 91 ft.*lbf)
(b) Install a new cotter pin.
NOTICE:
If the holes for the cotter pin are not aligned,
tighten the nut further up to 60°.
2. INS ...
