
Toyota Sienna Service Manual: Installation
1. INSTALL OUTSIDE MOULDING
- Using a heat light, heat the mounting surface of the
vehicle body between 40 to 60 C (104 to 140 F).
NOTICE: Do not heat the body excessively.
- Remove the tape from the vehicle body.
- Wipe off the stains with cleaner.
- Clean the outside moulding (if reusing the outside moulding)
- Using a heat light, heat the outside moulding between 20 to 30 C (68 to 86 F).
NOTICE: Do not heat the outside moulding excessively.
- Remove the tape from the outside moulding.
- Wipe off the stains with cleaner.
- Apply new tape to the outside moulding as shown in the illustration.
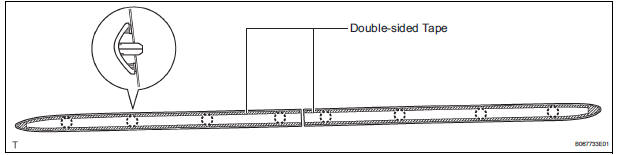
- Match the reference pins on the outside moulding with the reference holes on the vehicle body.
- Using a heat light, heat the vehicle body and outside moulding.
Heating temperature:

NOTICE: Do not heat the body and outside moulding excessively.
- Release the peeling paper from the face of the outside moulding and attach the outside moulding securely to the vehicle body.
NOTICE: Be careful that dirt or foreign objects do not stick to adhesive part when releasing the peeling paper.
- Push the outside moulding to the body.
 Removal
1. REMOVE OUTSIDE MOULDING
Put protective tape around the outside moulding.
Using a heat light, heat the moulding between 40 to
60 C (104 to 140 F).
NOTICE:
Do not heat the moulding ex ...
 Front door window frame moulding
COMPONENTS
...
Other materials:
Disassembly
1. REMOVE NO. 1ULTRASONIC SENSOR RETAINER
(w/ Clearance Sonar System) (See page PM-19)
2. REMOVE NO. 1 ULTRASONIC SENSOR (w/
Clearance Sonar System) (See page PM-19)
3. REMOVE REAR BUMPER ENERGY ABSORBER
4. REMOVE REAR BUMPER BAR PLATE
Remove the 4 clips and the rear bumper bar plate.
5. ...
Vehicle Speed Signal Circuit between Radio Receiver and Combination
Meter
DESCRIPTION
This circuit is necessary for the ASL (Auto Sound Leveliser) built into the
radio receiver.
Speed signals are received from the combination meter and used for the ASL.
The ASL function automatically adjusts the sound data in order to enable hearing
the clear audio sound
even ...
Problem symptoms table
SLIDE DOOR CLOSER SYSTEM
Symptom
Suspected Area
Slide door closer LH does not operate (*1)
ECU-B fuse
Power slide door lock assembly LH
Power slide door ECU LH
Wire harness
Slide door closer RH does not operate
ECU-B ...
