
Toyota Sienna Service Manual: Mass or Volume Air Flow Circuit/ Mass or Volume Air Flow Circuit Low Input/ Mass or Volume Air Flow Circuit High Input
DESCRIPTION The Mass Air Flow (MAF) meter is a sensor that measures the amount of air flowing through the throttle valve. The ECM uses this information to determine the fuel injection time and to provide appropriate airfuel ratio. Inside the MAF meter, there is a heated platinum wire which is exposed to the flow of intake air.
By applying a specific electrical current to the wire, the ECM heats it to a specific temperature. The flow of incoming air cools both the wire and an internal thermistor, changing their resistance. To maintain a constant current value, the ECM varies the voltage applied to these components in the MAF meter. The voltage level is proportional to the air flow through the sensor, and the ECM uses it to calculate the intake air volume.
The circuit is constructed so that the platinum hot wire and the temperature sensor provide a bridge circuit, and the power transistor is controlled so that the potentials of A and B remain equal to maintain the predetermined temperature.
HINT: When any of these DTCs are set, the ECM enters fail-safe mode. During fail-safe mode, the ignition timing is calculated by the ECM, according to the engine RPM and throttle valve position. Fail-safe mode continues until a pass condition is detected
|
DTC No. |
DTC Detection Condition |
Trouble Area |
| P0100 | Open or short in Mass Air Flow (MAF) meter circuit for 3 seconds |
|
| P0102 | Open in Mass Air Flow (MAF) meter circuit for 3 seconds |
|
| P0103 | Short in Mass Air Flow (MAF) meter circuit for 3 seconds |
|
HINT: When any of these DTCs are set, check the air-flow rate by selecting the following menu items on an intelligent tester: DIAGNOSIS / ENHANCED OBD II / DATA LIST / PRIMARY / MAF.
|
Mass Air Flow Rate (gm/s) |
Malfunctions |
|
Approximately 0.0 |
|
|
271.0 or more |
Open in E2G circuit |
MONITOR DESCRIPTION
If there is a defect in the MAF meter or an open or short circuit, the voltage level deviates from the normal operating range. The ECM interprets this deviation as a malfunction in the MAF meter and sets a DTC.
Example: When the sensor voltage output remains less than 0.2 V, or more than 4.9 V, for more than 3 seconds, the ECM sets a DTC.
If the malfunction is not repaired successfully, a DTC is set 3 seconds after the engine is next started.
MONITOR STRATEGY
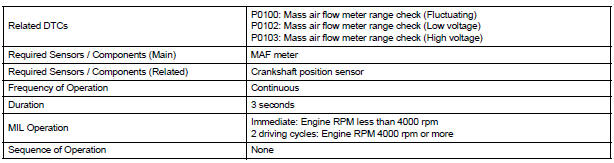
TYPICAL ENABLING CONDITIONS

TYPICAL MALFUNCTION THRESHOLDS
P0100:

P0102:

P0103:

COMPONENT OPERATING RANGE

WIRING DIAGRAM
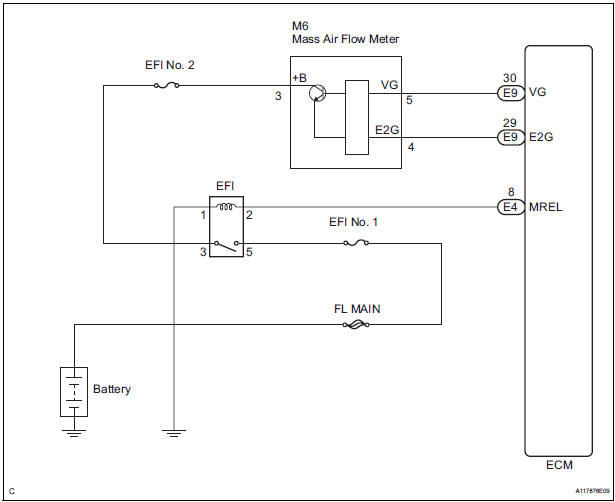
INSPECTION PROCEDURE
HINT: Read freeze frame data using the intelligent tester. The ECM records vehicle and driving condition information as freeze frame data the moment a DTC is stored. When troubleshooting, freeze frame data can be helpful in determining whether the vehicle was running or stopped, whether the engine was warmed up or not, whether the air-fuel ratio was lean or rich, as well as other data recorded at the time of a malfunction.
1 READ VALUE OF INTELLIGENT TESTER (MASS AIR FLOW RATE)
- Connect the intelligent tester to the DLC3.
- Start the engine.
- Turn the tester on.
- Select the following menu items: DIAGNOSIS / ENHANCED OBD II / DATA LIST / PRIMARY / MAF.
- Read the values displayed on the tester.
Result

*1: The value must be changed when the throttle valve is open or closed.
2 INSPECT MASS AIR FLOW METER (POWER SOURCE VOLTAGE)
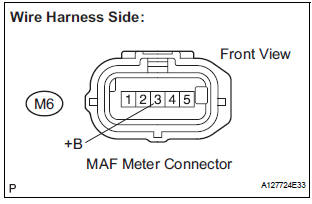
- Disconnect the M6 Mass Air Flow (MAF) meter connector.
- Turn the ignition switch to the ON position.
- Measure the voltage according to the value(s) in the table below.
Standard voltage

- Reconnect the MAF meter connector.
3 INSPECT ECM (VG VOLTAGE)
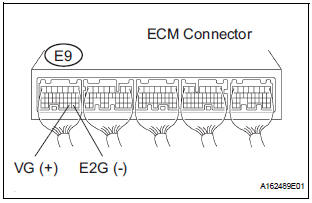
- Start the engine.
- Measure the voltage between the terminals of the E9 ECM connector.
HINT: The transmission gear selector lever should be in the P or N position and the A/C switch should be turned off.
Standard voltage

4 CHECK HARNESS AND CONNECTOR (MASS AIR FLOW METER - ECM)
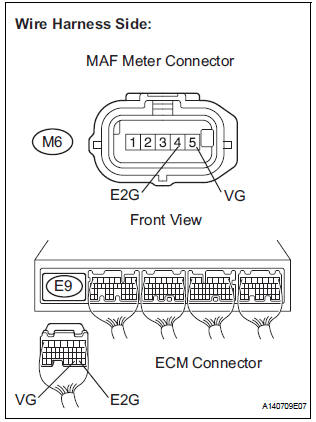
- Disconnect the M6 MAF meter connector.
- Disconnect the E9 ECM connector.
- Measure the resistance according to the value(s) in the table below.
Standard resistance : Check for open

Check for short

- Reconnect the MAF meter connector.
- Reconnect the ECM connector
REPLACE MASS AIR FLOW METER
5 INSPECT FUSE (EFI NO. 2 FUSE)
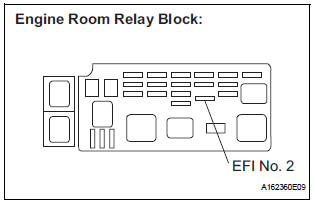
- Remove the EFI No. 2 fuse from the engine room relay block.
- Measure the resistance according to the value(s) in the
table below.
Standard resistance: Below 1 Ω
- Reinstall the EFI No. 2 fuse.
REPAIR OR REPLACE HARNESS OR CONNECTOR (MASS AIR FLOW METER - EFI RELAY)
6 INSPECT ECM (SENSOR GROUND)
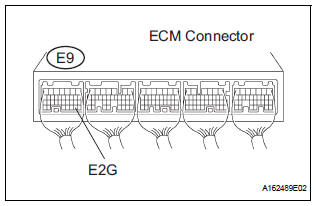
- Measure the resistance according to the value(s) in the table below.
Standard resistance

7 CHECK HARNESS AND CONNECTOR (MASS AIR FLOW METER - ECM)
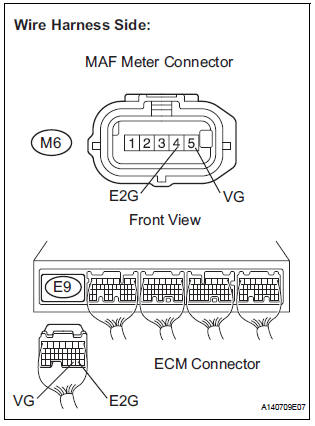
- Disconnect the M6 MAF meter connector.
- Disconnect the E9 ECM connector.
- Measure the resistance according to the value(s) in the table below.
Standard resistance: Check for open

Check for short

- Reconnect the MAF meter connector.
- Reconnect the ECM connector.
REPLACE MASS AIR FLOW METER
 Oxygen Sensor Heater Control Circuit Low/ Oxygen Sensor Heater Control
Circuit High/ Oxygen Sensor Heater Circuit Malfunction
Oxygen Sensor Heater Control Circuit Low/ Oxygen Sensor Heater Control
Circuit High/ Oxygen Sensor Heater Circuit Malfunction
DTC P0037 Oxygen Sensor Heater Control Circuit Low
(Bank 1 Sensor 2)
DTC P0038 Oxygen Sensor Heater Control Circuit High
(Bank 1 Sensor 2)
DTC P0057 Oxygen Sensor Heater Control Circuit Low
(Bank ...
 Mass or Volume Air Flow Circuit Range / Performance
Problem
Mass or Volume Air Flow Circuit Range / Performance
Problem
DTC P0101 Mass or Volume Air Flow Circuit Range / Performance
Problem
DESCRIPTION
Refer to DTC P0100
DTC No.
DTC Detection Condition
Trouble Area
P0101
...
Other materials:
Erasing the entire HomeLink® memory (all three programs)
Press and hold down the 2 outside
buttons for 10 seconds until
the indicator light flashes.
If you sell your vehicle, be sure to
erase the programs stored in the
HomeLink® memory.
Before programming
Install a new battery in the transmitter.
The battery side of the transmitter must ...
Shift Solenoid "D" Performance (Shift Solenoid
Valve S4)
SYSTEM DESCRIPTION
The ECM uses signals from the vehicle speed sensor to detect the actual gear
position (1st, 2nd, 3rd, 4th
or 5th gear).
Then the ECM compares the actual gear with the shift schedule in the ECM memory
to detect mechanical
problems of the shift solenoid valves, valve b ...
Removal
1. REMOVE BACK DOOR CENTER GARNISH (See page
ET-18)
2. REMOVE POWER BACK DOOR ROD (See page ED-
220)
3. REMOVE BACK DOOR LH SIDE GARNISH
4. REMOVE BACK DOOR RH SIDE GARNISH
5. REMOVE BACK DOOR PULL STRAP (See page ED-
221)
6. REMOVE BACK DOOR TRIM BOARD ASSEMBLY
7. REMOVE LH BACK-UP LIGH ...
