
Toyota Sienna Service Manual: Mirror Switch Circuit
DESCRIPTION
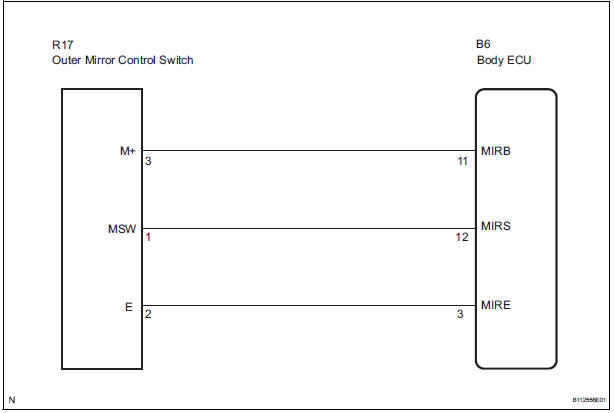
- A switch signal of the outer mirror switch is transmitted to the selected outer mirror control ECU by way of the body ECU. Then, the outer mirror control ECU activates the mirror motor to move the mirror UP, DOWN, RIGHT and LEFT in response to the inputs.
HINT: The power mirror control system is part of the multiplex communication system (BEAN). This system features shared communication wiring that reduces the wiring complexity of the communication lines.
The first step in any repair is to confirm the proper operation of the communication system. Proceed with troubleshooting after the communication has been verified (See Multiplex Communication System).
WIRING DIAGRAM
INSPECTION PROCEDURE
1 INSPECT OUTER MIRROR SWITCH
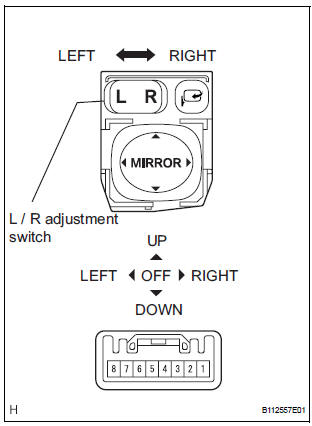
- Remove the outer mirror control switch.
- Measure the resistance according to the value(s) in the table below when the switch is operated.
Resistance
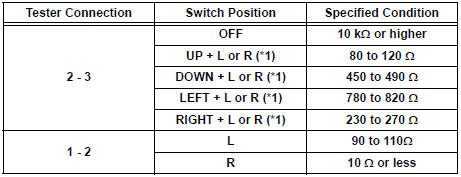
*1: The L or R of the left / right adjustment switch.
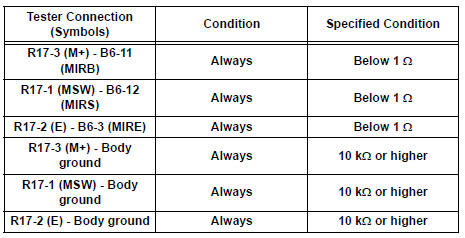
2 CHECK WIRE HARNESS (OUTER MIRROR SWITCH - MAIN BODY ECU RH)
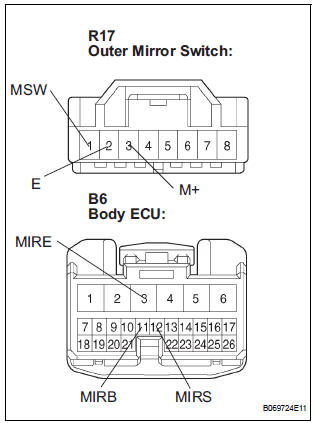
- Disconnect the B6 ECU connector.
- Measure the resistance according to the value(s) in the table below.
Resistance
PROCEED TO NEXT INSPECTION SHOWN IN PROBLEM SYMPTOMS TABLE
 Door Mirror Foot Light Circuit
DESCRIPTION
When the outer mirror control ECU receives the signal(s) from the body ECU
through BEAN
communication, it illuminates the foot light. The foot light is installed on the
bottom of the ...
 Mirror Motor Circuit
DESCRIPTION
A mirror control switch signal and memorized mirror positions are sent to the
outer mirror control ECU.
The outer mirror control ECU drives the selected mirror UP, DOWN, LEFT and RIG ...
Other materials:
U151e automatic transaxle
SERVICE DATA
TORQUE SPECIFICATIONS
...
Unlocking and locking the doors from the outside
Entry function (vehicles with a smart key system)
Carry the electronic key to enable this function.
Grip the driver’s door handle
to unlock the door. Grip the
passenger’s door handle to
unlock all the doors.*
Make sure to touch the sensor
on the back of the handle.
The doors ...
Turn signal lever
Operating instructions
Right turn
Left turn
Lane change to the right (move
the lever partway and release
it)
The right hand signals will flash 3
times.
Lane change to the left (move
the lever partway and release
it)
The left hand signals will flash 3
times.
Turn sign ...
