Toyota Sienna Service Manual: Rear door lock
INSPECTION
1. INSPECT REAR DOOR LOCK ACTUATOR ASSEMBLY LH
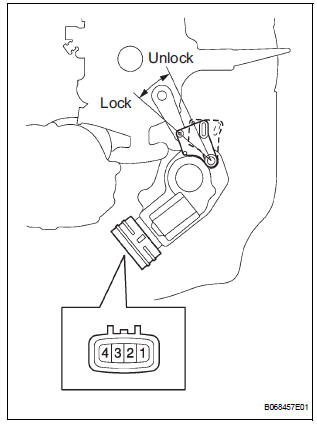
- Apply battery voltage to the door lock and check operation of the motor.
OK
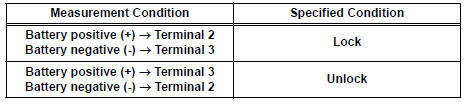
HINT: If the result is not as specified, replace the door lock assembly.
- Measure the resistance according to the value(s) in the table below.
Standard resistance

HINT: If the result is not as specified, replace the door lock assembly.
2. INSPECT REAR DOOR LOCK ACTUATOR ASSEMBLY RH
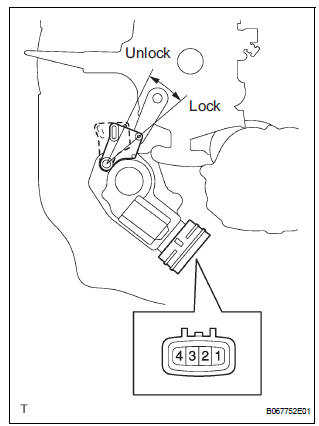
- Apply battery voltage to the door lock and check operation of the motor.
OK
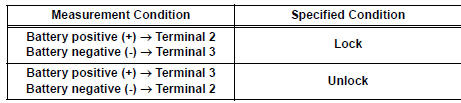
HINT: If the result is not as specified, replace the door lock assembly.
- Measure the resistance according to the value(s) in the table below.
Standard resistance

HINT: If the result is not as specified, replace the door lock assembly.
 Front door lock
INSPECTION
1. INSPECT FRONT DOOR W/ MOTOR LOCK ASSEMBLY LH
Apply battery voltage to the door lock and check
operation of the motor.
OK
HINT:
If the result is not as specified, ...
 Back door lock
INSPECTION
1. INSPECT BACK DOOR LOCK ASSEMBLY (W/O
CLOSER)
Check operation of the door lock.
Using a screwdriver, push the latch in order to
put the back door lock in the ...
Other materials:
Operating the meter control switches
The multi-information display is
operated using the meter control
switches.
Enter/Set
Select an item/Change pages
Return to the previous screen
Press: Displays the screen registered
as the top screen
When no screen has been registered, the drive information screen will be
displ ...
Removal
1. Remove rear wheel
2. Remove skid control sensor wire (for 2wd)
Hint:
(see page sp-38)
hint:
disconnect the rh side by the same procedures as the
lh side.
3. SEPARATE SPEED SENSOR REAR LH (for 4WD)
HINT:
(See page SP-38)
4. SEPARATE SPEED SENSOR REAR RH (for 4WD)
HINT:
Separate the RH ...
Door LOCK Position Circuit
DESCRIPTION
This circuit detects the state of the door lock detection sensor and send it
to the Multiplex network body
ECU.
WIRING DIAGRAM
INSPECTION PROCEDURE
1 READ VALUE OF INTELLIGENT TESTER
Connect the intelligent tester to DLC3.
Turn the ignition switch ON and push the i ...
