Toyota Sienna Service Manual: Removal
HINT:
- Use the same procedures for the RH side and LH side.
- The procedures listed below are for the LH side.
1. PRECAUTION
CAUTION: Be sure to read "PRECAUTION" thoroughly before servicing.
2. DISCONNECT CABLE FROM NEGATIVE BATTERY TERMINAL
CAUTION: Wait for 90 seconds after disconnecting the cable to prevent the airbag working.
3. REMOVE FRONT DOOR SCUFF PLATE LH
4. REMOVE REAR DOOR SCUFF PLATE LH
5. REMOVE FRONT DOOR OPENING TRIM WEATHERSTRIP LH
6. REMOVE REAR DOOR WEATHERSTRIP LH
7. REMOVE LAP BELT OUTER ANCHOR COVER LH
8. REMOVE CENTER PILLAR GARNISH LOWER LH
9. REMOVE FRONT SEAT OUTER BELT ASSEMBLY
10. REMOVE SIDE AIRBAG SENSOR LH
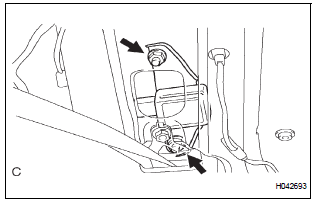
- Disconnect the connector from the side airbag sensor LH.
- Remove the 2 nuts and the side airbag sensor LH.
 On-vehicle inspection
1. INSPECT SIDE AIRBAG SENSOR (VEHICLE NOT
INVOLVED IN COLLISION)
Perform a diagnostic system check.
2. INSPECT SIDE AIRBAG SENSOR (VEHICLE
INVOLVED IN COLLISION AND AIRBAG HAS NOT
DEP ...
 Installation
HINT:
Use the same procedures for the RH side and LH side.
The procedures listed below are for the LH side.
1. INSTALL SIDE AIRBAG SENSOR LH
Check that the ignition ...
Other materials:
Adjustment procedure
Hold the steering wheel and
push the lever down.
Adjust to the ideal position by
moving the steering wheel horizontally
and vertically.
After adjustment, pull the lever up
to secure the steering wheel.
...
Repair
1. REPAIR REAR WINDOW DEFOGGER WIRE
Clean the broken wire tips with grease, wax and
silicone remover.
Place the masking tape along the both sides of the
wire.
Thoroughly mix the repair agent (Dupont paste No.
4817).
Using a fine tip brush, apply a smal ...
Engine
ON-VEHICLE INSPECTION
1. INSPECT ENGINE COOLANT
(a) Inspect the engine coolant (See page CO-1).
2. INSPECT ENGINE OIL
(a) Inspect the engine oil (See page LU-1).
3. INSPECT BATTERY
(a) Inspect the battery (See page CH-5).
4. INSPECT AIR CLEANER FILTER ELEMENT SUBASSEMBLY
(a) Remove the air c ...
