
Toyota Sienna Service Manual: Installation
HINT:
- Use the same procedures for the RH side and LH side.
- The procedures listed below are for the LH side.
1. INSTALL SIDE AIRBAG SENSOR LH
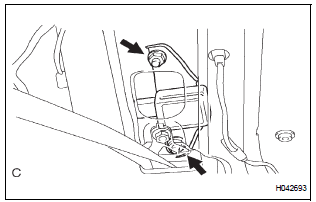
- Check that the ignition switch is off.
- Check that the battery negative (-) terminal is disconnected.
CAUTION: After disconnecting the negative battery terminal, wait for at least 90 seconds before starting the operation.
- Install the side airbag sensor LH with the 2 nuts.
Torque: 17.5 N*m (179 kgf*cm, 13 ft.*lbf)
NOTICE:
- - If the side airbag sensor LH has been dropped, or there are any cracks, dents or other defects in the case, bracket or connector, replace it with a new one.
- When installing the side airbag sensor LH, be careful that the SRS wiring does not interfere with other parts and that it is not pinched between other parts.
- Check that there is no looseness in the installation parts of the side airbag sensor LH.
- Connect the connector to the side airbag sensor LH.
2. INSTALL FRONT SEAT OUTER BELT ASSEMBLY
3. INSTALL CENTER PILLAR GARNISH LOWER LH
4. INSTALL LAP BELT OUTER ANCHOR COVER LH
5. INSTALL REAR DOOR WEATHERSTRIP LH
6. INSTALL FRONT DOOR OPENING TRIM WEATHERSTRIP LH
7. INSTALL FRONT DOOR SCUFF PLATE LH
8. INSTALL REAR DOOR SCUFF PLATE LH
9. CONNECT CABLE TO NEGATIVE BATTERY TERMINAL
10. PERFORM INITIALIZATION
- Perform initialization.
HINT: Some systems need initialization when disconnecting the cable from the negative battery terminal.
11. INSPECT SRS WARNING LIGHT
- Inspect the SRS warning light
 Removal
HINT:
Use the same procedures for the RH side and LH side.
The procedures listed below are for the LH side.
1. PRECAUTION
CAUTION:
Be sure to read "PRECAUTION" thoroughly be ...
 Rear airbag sensor
COMPONENTS
...
Other materials:
Maintenance data
(fuel, oil level, etc.)
Dimensions and weights
*1: Unladen vehicle
*2: The model code is indicated on the Certification Label. For details, see
“Vehicle identification� below.
*3: The towing package is required.
Toyota does not recommend towing with this vehicle without the towing
package.
Vehicle identifi ...
Internal Control Module Random Access Memory (RAM) Error
DESCRIPTION
The ECM continuously monitors its own internal memory status, internal
circuits, and output signals
transmitted to the throttle actuator. This self-check ensures that the ECM is
functioning properly. If any
malfunction is detected, the ECM sets the appropriate DTC and illumina ...
SRS Warning Light does not Come ON
DESCRIPTION
WIRING DIAGRAM
INSPECTION PROCEDURE
1 CHECK BATTERY
Measure the voltage of the battery.
Standard voltage:
11 to 14 V
2 CHECK CONNECTORS
Turn the ignition switch to the LOCK position.
Disconnect the negative (-) terminal cable from the
battery, and wait for at le ...
