Toyota Sienna Service Manual: Removal
1. PRECAUTION
CAUTION: Be sure to read "PRECAUTION" thoroughly before servicing.
2. DISCONNECT CABLE FROM NEGATIVE BATTERY TERMINAL
CAUTION: Wait for 90 seconds after disconnecting the cable to prevent the airbag working.
3. PLACE FRONT WHEELS FACING STRAIGHT AHEAD
4. REMOVE STEERING WHEEL NO.3 COVER LOWER
5. REMOVE STEERING WHEEL NO.2 COVER LOWER
6. REMOVE STEERING PAD
7. REMOVE STEERING WHEEL ASSEMBLY
8. REMOVE STEERING COLUMN COVER
9. REMOVE GLOVE COMPARTMENT DOOR ASSEMBLY
10. REMOVE INSTRUMENT PANEL BOX NO.2
11. DISCONNECT FRONT PASSENGER AIRBAG ASSEMBLY CONNECTOR
- Disconnect the connector from the front passenger airbag assembly.
NOTICE: When handling the airbag connector, take care not to damage the airbag wire harness.
12. REMOVE INSTRUMENT PANEL SUB-ASSEMBLY
13. REMOVE FRONT PASSENGER AIRBAG ASSEMBLY
- Remove the 2 screws.
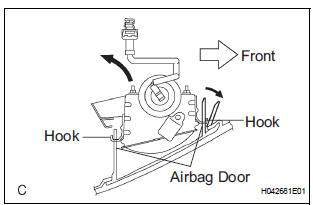
- Release the front side wall of the airbag door from the hook by slightly deflecting it and roll the front passenger airbag assembly rearward.
- Release the rear side wall of the airbag door from the other hook and remove the front passenger airbag assembly.
 On-vehicle inspection
1. INSPECT FRONT PASSENGER AIRBAG ASSEMBLY
(VEHICLE NOT INVOLVED IN COLLISION)
Perform a diagnostic system check.
With the front passenger airbag assembly installed
on the veh ...
 Installation
1. INSTALL FRONT PASSENGER AIRBAG ASSEMBLY
Install the front passenger airbag assembly with the
2 screws.
2. INSTALL INSTRUMENT PANEL SUB-ASSEMBLY
3. CONNECT FRONT PASSENGER AIRBAG ...
Other materials:
Installation
1. INSTALL REAR NO. 2 SEAT ASSEMBLY
Lock the seat leg rear to the floor striker.
Lock the seat leg front to the floor striker.
Install the rear No. 2 seat assembly with the 8 bolts.
Torque: 19 N*m (194 kgf*cm, 14 ft.*lbf)
NOTICE:
Tighten the bolts in the order sho ...
ECM
COMPONENTS
REMOVAL
1. REMOVE GLOVE COMPARTMENT DOOR ASSEMBLY
(a) Push the right side wall and then push the left wall
to release the stoppers.
(b) Pull the glove compartment door sub-assembly
rearward to remove it.
2. REMOVE NO. 2 INSTRUMENT PANEL BOX
(a) Disengage the 2 claws ...
Diagnosis system
1. CHECK DLC3
The vehicle's ECU uses ISO 15765-4 for
communication protocol. The terminal arrangement
of the DLC3 complies with SAE J1962 and matches
the ISO 15765-4 format.
NOTICE:
*: Before measuring the resistance, leave the
vehicle as is for at least 1 minute and do ...
