Toyota Sienna Service Manual: Removal
HINT:
- Use the same procedures for the RH side and LH side.
- The procedures listed below are for the LH side.
1. PRECAUTION
CAUTION: Be sure to read "PRECAUTION" thoroughly before servicing.
2. DISCONNECT CABLE FROM NEGATIVE BATTERY TERMINAL
CAUTION: Wait for 90 seconds after disconnecting the cable to prevent the airbag working.
3. REMOVE FRONT DOOR SCUFF PLATE LH
4. REMOVE REAR DOOR SCUFF PLATE LH
5. REMOVE FRONT DOOR OPENING TRIM WEATHERSTRIP LH
6. REMOVE REAR DOOR WEATHERSTRIP LH
7. REMOVE LAP BELT OUTER ANCHOR COVER LH
8. REMOVE CENTER PILLAR GARNISH LOWER LH
9. REMOVE FRONT SEAT OUTER BELT ASSEMBLY
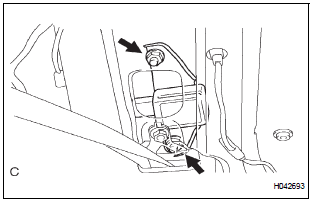
10. REMOVE SIDE AIRBAG SENSOR LH

- Disconnect the connector from the side airbag sensor LH.
- Remove the 2 nuts and the side airbag sensor LH.
 On-vehicle inspection
1. INSPECT SIDE AIRBAG SENSOR (VEHICLE NOT
INVOLVED IN COLLISION)
Perform a diagnostic system check.
2. INSPECT SIDE AIRBAG SENSOR (VEHICLE
INVOLVED IN COLLISION AND AIRBAG HAS NOT
DEP ...
 Installation
HINT:
Use the same procedures for the RH side and LH side.
The procedures listed below are for the LH side.
1. INSTALL SIDE AIRBAG SENSOR LH
Check that the ignition switch ...
Other materials:
Problem symptoms table
Proceed to the reference page shown in the table below for
each malfunction symptom and troubleshoot each circuit.
HINT:
Troubleshooting of the theft deterrent system is based on the
premise that the door lock control system and the wireless
door lock control system are operating normally. Ac ...
System description
1. OUTLINE
As a unique feature of Rear Seat Entertainment
(RSE) system, the front and rear seat occupants can
enjoy different audio-visual modes at the same time.
Thus, this system offers enhanced entertainment to
the rear seat occupants.
The rear seat occupants can control the ...
Open in Side Squib LH Circuit
DTC B0116/48 Open in Side Squib LH Circuit
DESCRIPTION
The side squib LH circuit consists of the center airbag sensor assembly and
the front seat side assembly
LH.
This circuit instructs the SRS to deploy when deployment conditions are met.
DTC B0116/48 is recorded when an open circuit is ...
