
Toyota Sienna Service Manual: Removal
HINT:
- Use the same procedures for the RH side and LH side.
- The procedures listed below are for the LH side.
1. PRECAUTION
CAUTION: Be sure to read "PRECAUTION" thoroughly before servicing.
2. DISCONNECT CABLE FROM NEGATIVE BATTERY TERMINAL
CAUTION: Wait for 90 seconds after disconnecting the cable to prevent the airbag working.
3. REMOVE REAR DOOR SCUFF PLATE RH
4. REMOVE REAR DOOR WEATHERSTRIP RH
5. REMOVE BACK DOOR WEATHERSTRIP
6. REMOVE BACK DOOR SCUFF PLATE
7. REMOVE LAP BELT OUTER ANCHOR COVER
8. REMOVE FRONT QUARTER TRIM PANEL ASSEMBLY RH
9. REMOVE AIR DUCT ASSEMBLY
- Remove the screw and the air duct assembly.
10. REMOVE REAR AIRBAG SENSOR LH
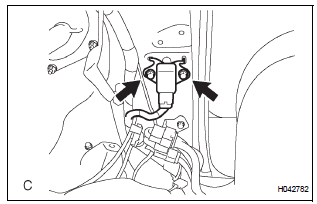
- Disconnect the connector from the rear airbag sensor LH.
- Remove the 2 bolts and the rear airbag sensor LH.
 On-vehicle inspection
1. INSPECT REAR AIRBAG SENSOR (VEHICLE NOT
INVOLVED IN COLLISION)
Perform a diagnostic system check.
2. INSPECT REAR AIRBAG SENSOR (VEHICLE
INVOLVED IN COLLISION AND AIRBAG HAS NOT
DEP ...
 Installation
HINT:
Use the same procedures for the RH side and LH side.
The procedures listed below are for the LH side.
1. INSTALL REAR AIRBAG SENSOR LH
Check that the ignition ...
Other materials:
Front No. 2 speaker
COMPONENTS
ON-VEHICLE INSPECTION
1. INSPECT FRONT NO.2 SPEAKER
HINT:
Remove interior parts so that the front No.2 speaker can
be seen.
Check the speaker installation.
OK:
The speaker is securely installed.
If the result is not as specified, reinstall the front
No.2 speak ...
Side Airbag Sensor Assembly LH Circuit Malfunction
DTC B1141/33 Side Airbag Sensor Assembly LH Circuit Malfunction
DESCRIPTION
The side airbag sensor LH circuit consists of the center airbag sensor
assembly and side airbag sensor
LH.
If the center airbag sensor assembly receives signals from the side airbag
sensor LH, it judges whether or
...
Zero Point Calibration of Yaw Rate Sensor Undone
DESCRIPTION
The skid control ECU receives signals from the yaw rate sensor via CAN
communication system.
Yaw rate sensor has the built-in deceleration sensor.
If there is trouble in the bus lines between the yaw rate and deceleration
sensor and CAN communication
system, the DTC U0123 ...
