Toyota Sienna Service Manual: Removal
HINT: On the RH side, use the same procedures as on the LH side.
1. REMOVE FRONT DOOR SERVICE HOLE COVER LH
- Remove the front lower frame bracket garnish LH.
- Remove the front door inside handle bezel plug LH.
- Remove the front armrest base panel upper LH.
- Remove the power window regulator master switch.
- Remove the front door trim board LH.
- Remove the front door service hole cover LH.
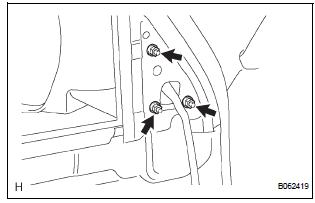
2. REMOVE OUTER REAR VIEW MIRROR ASSEMBLY LH

- Disconnect the connector.
- Remove the 3 nuts and mirror.
 Outer rear view mirror
COMPONENTS
...
 Inspection
1. INSPECT OUTER REAR VIEW MIRROR ASSEMBLY LH (w/o Memory)
Disconnect the mirror connector.
Check operation of the outer mirror.
Apply battery voltage and inspect operation ...
Other materials:
Installation
1. INSTALL CRANKSHAFT POSITION SENSOR
Apply a light coat of engine oil to the O-ring on the
crankshaft position sensor.
Install the crankshaft position sensor with the bolt.
Torque: 9.0 N*m (92 kgf*cm, 80 in.*lbf)
Connect the crankshaft position sensor connector.
...
Installation
HINT:
Install the RH side by the same procedures with LH side.
1. INSTALL FRONT SPEED SENSOR LH
(a) Install the speed sensor front LH with the bolt.
Torque: 8.0 N*m (82 kgf*cm, 71 in.*lbf)
NOTICE:
Keep the tip of the front speed sensor LH.
(b) Install the sensor harness clamps with th ...
Removal
HINT:
On the RH side, use the same procedures as on the LH side.
1. REMOVE REAR NO. 1 SEAT ASSEMBLY LH
HINT:
Captain seat type:
Center seat type:
2. REMOVE REAR DOOR WEATHERSTRIP LH
3. REMOVE ROPE HOOK ASSEMBLY
4. REMOVE BACK DOOR SCUFF PLATE
5. REMOVE ROOF HEADLINING GA ...
