Toyota Sienna Service Manual: Inspection
1. INSPECT OUTER REAR VIEW MIRROR ASSEMBLY LH (w/o Memory)
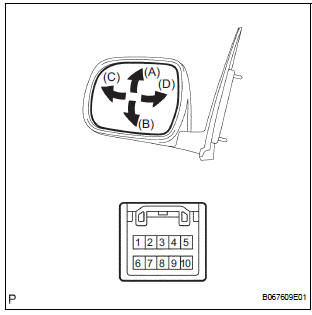
- Disconnect the mirror connector.
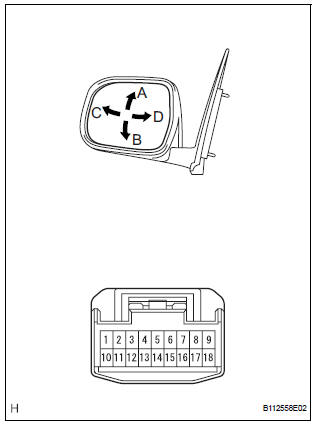
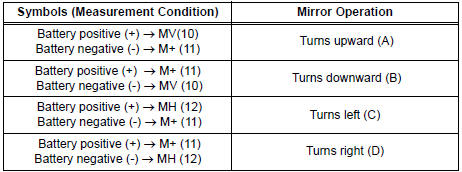
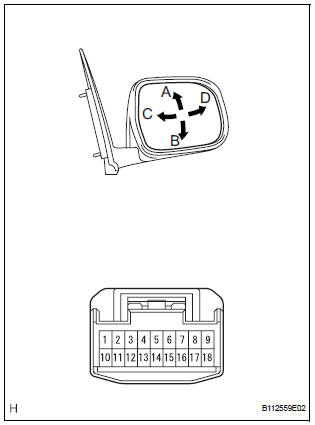
- Check operation of the outer mirror.
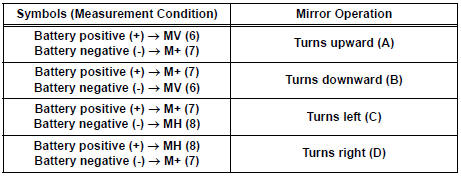
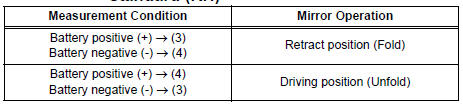
- Apply battery voltage and inspect operation of the mirror face, as shown in the table and illustration.
Standard (LH)
If the result is not as specified, replace the mirror assembly.
2. INSPECT OUTER REAR VIEW MIRROR ASSEMBLY RH (w/o Memory)
- Disconnect the mirror connector.
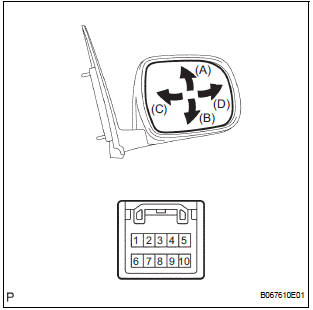
- Check operation of the outer mirror.
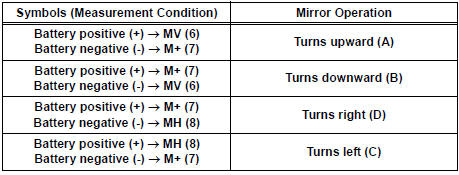
- Apply battery voltage and inspect operation of the mirror face, as shown in the table and illustration.
Standard (RH)
If the result is not as specified, replace the mirror assembly.
3. INSPECT OUTER REAR VIEW MIRROR ASSEMBLY LH (w/ Memory)
- Disconnect the mirror connector.
- Check operation of the outer mirror.
- Apply battery voltage and inspect operation of the mirror face, as shown in the table and illustration.
Standard (LH)
If the result is not as specified, replace the mirror assembly.
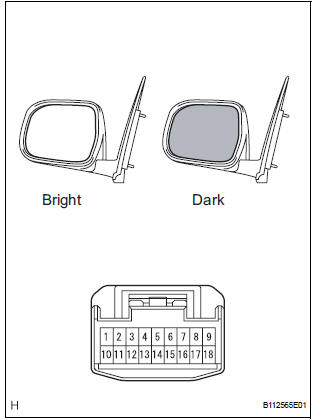
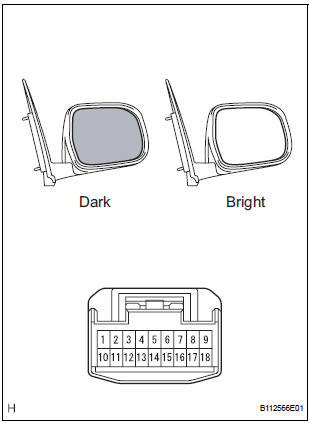
- Check operation of the EC mirror.
- Apply battery voltage and inspect operation of the mirror face, as shown in the table and illustration.
Standard (LH)

If the result is not as specified, replace the mirror assembly.
- Check of the retract function.
- Apply battery voltage and inspect operation of the mirror, as shown in the table and illustration.
Standard (LH)

If the result is not as specified, replace the mirror assembly.
4. INSPECT OUTER REAR VIEW MIRROR ASSEMBLY RH (w/ Memory)
- Disconnect the mirror connector.
- Check operation of the outer mirror.
- Apply battery voltage and inspect operation of the mirror face, as shown in the table and illustration.
Standard (RH)
If the result is not as specified, replace the mirror assembly.
- Check operation of the EC mirror.
- Apply battery voltage and inspect operation of the mirror face, as shown in the table and illustration.
Standard (RH)

If the result is not as specified, replace the mirror assembly.
- Check of the retract function.
- Apply battery voltage and inspect operation of the mirror, as shown in the table and illustration.
Standard (RH)
If the result is not as specified, replace the mirror assembly.
 Removal
HINT:
On the RH side, use the same procedures as on the LH side.
1. REMOVE FRONT DOOR SERVICE HOLE COVER LH
Remove the front lower frame bracket garnish LH.
Remove the front door i ...
 Installation
1. INSTALL OUTER REAR VIEW MIRROR ASSEMBLY LH
Install the mirror with the 3 nuts.
Torque: 8.0 N*m (82 kgf*cm, 71 in.*lbf)
Connect the connector.
...
Other materials:
Summary of the Blind Spot Monitor
The Blind Spot Monitor is a system that has 2 functions:
The Blind Spot Monitor function
Assists the driver in making the decision when changing lanes
The Rear Cross Traffic Alert function
Assists the driver when backing up
These functions use same sensors.
BSM main switch
Pre ...
Data list / active test
1. USING INTELLIGENT TESTER
Connect the intelligent tester to the DLC3.
Monitor the ECU data by following the prompts on
the tester screen.
HINT:
The intelligent tester has a "Snapshot" function
which records the monitored data.
Refer to the intelligent tester o ...
Navigation check mode
HINT:
This mode displays GPS satellite information.
Illustrations may differ from the actual vehicle depending
on the device settings and options. Therefore, some
detailed areas may not be shown exactly the same as on
the actual vehicle.
1. ENTER DIAGNOSTIC MODE ( )
2. NA ...
