Toyota Sienna Service Manual: Repair
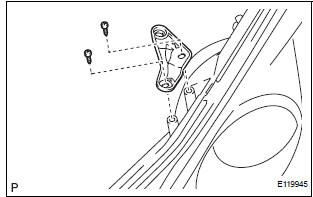
1. INSTALL HEADLIGHT PROTECTOR RETAINER UPPER
HINT:
- If the installation area of the headlight assembly is damaged, use the supply bracket for low-cost repair.
- Ensure that the headlight assembly is not damaged.
- Cut off the part shaded in the illustration and sand smooth with sandpaper.
NOTICE: After cutting off the part, place the headlight protector retainer upper against the bosses and gradually file away until installation is possible.
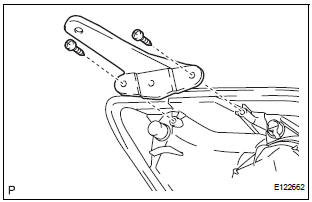
- Install the headlight protector retainer upper with the 2 screws.
2. INSTALL LOWER HEADLIGHT BRACKET
HINT:
- If the installation area of the headlight assembly is damaged, use the supply bracket for low-cost repair.
- Ensure that the headlight assembly is not damaged.
- Cut off the part shaded in the illustration and sand smooth with sandpaper.
NOTICE: After cutting off the part, place the lower headlight bracket against the bosses and gradually file away until installation is possible.
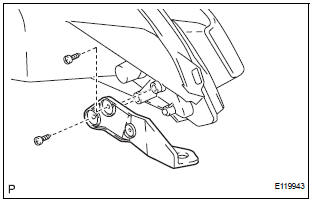
- Install the lower headlight bracket with the 2 screws.
3. INSTALL INNER HEADLIGHT MOUNTING BRACKET
HINT:
- If the installation area of the headlight assembly is damaged, use the supply bracket for low-cost repair.
- Ensure that the headlight assembly is not damaged.
- Cut off the part shaded in the illustration and sand smooth with sandpaper.
NOTICE: After cutting off the part, place the inner headlight mounting bracket against the bosses and gradually file away until installation is possible.
- Install the inner headlight mounting bracket with the 2 screws.
 Installation
1. INSTALL HEADLIGHT ASSEMBLY
Connect the connectors.
Install the headlight assembly with the bolt and 3
screws.
2. INSTALL FRONT BUMPER ASSEMBLY
3. CONNECT CABLE TO NEGATI ...
 Daytime running light resister
On-vehicle inspection
1. DRL RESISTOR
Check that there is resistance between the
terminals as shown in the chart.
Resistance
...
Other materials:
Power slide door warning buzzer
INSPECTION
1. INSPECT POWER SLIDE DOOR WARNING BUZZER LH
Check the resistance of the buzzer.
Resistance
If the result is not as specified, replace the buzzer.
NOTICE:
The circuit that causes the buzzer to sound is
built into the slide door ECU, not around the
buzzer.
Direct ...
Inspection
1. INSPECT FRONT STABILIZER LINK ASSEMBLY LH
(a) As shown in the illustration, flip the ball joint stud
back and forth 5 times, before installing the nut.
(b) Using a torque wrench, turn the nut continuously at
a rate of 2 to 4 seconds per 1 turn and take the
torque reading on the 5th tur ...
Initialization
Items to initialize
The following items must be initialized for normal system operation
after such cases as the battery being reconnected, or maintenance
being performed on the vehicle.
Item
When to initialize
Power sliding door
(if equipped)
After reconnecting o ...
