
Toyota Sienna Service Manual: DTC check / clear
1. DTC CHECK
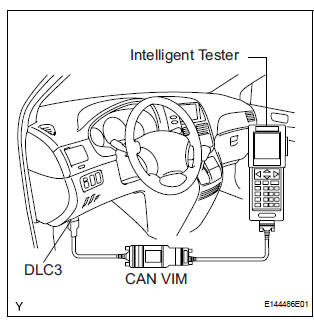
- Connect the intelligent tester to the DLC3.
- Connect the intelligent tester to the Controller Area Network Vehicle Interface Module (CAN VIM). Then connect the CAN VIM to the Data Link Connector 3 (DLC3).
- Turn the ignition switch to the ON position.
- Read the DTCs by following the prompts on the tester screen.
HINT: Refer to the intelligent tester operator's manual for further details.
2. DTC CLEAR
- Connect the intelligent tester to the DLC3.
- Turn the ignition switch to the ON position.
- Operate the intelligent tester to erase the codes.
HINT: Refer to the intelligent tester operator's manual for further details.
 Diagnosis system
1. CHECK DLC3
The ECU uses the ISO 15765-4 for communication
protocol. The terminal arrangement of the DLC3
complies with SAE J1962 and matches the ISO
15765-4 format.
NOTICE: ...
 Fail-safe chart
HINT:
If the following conditions are detected while the cruise
control is in operation, the system clears the stored vehicle
speed in the ECM and cancels the cruise control operation.
...
Other materials:
Installation
1. INSTALL CRANKSHAFT POSITION SENSOR
Apply a light coat of engine oil to the O-ring on the
crankshaft position sensor.
Install the crankshaft position sensor with the bolt.
Torque: 9.0 N*m (92 kgf*cm, 80 in.*lbf)
Connect the crankshaft position sensor connector.
...
Problem symptoms table
HINT:
Before inspecting the suspected areas listed in the table
below, check the fuse and relay.
Before inspecting the suspected areas listed in the table
below, check the DTCs.
Methods used to verify the cause of the problem are listed
in order of probability in the ...
Unlock Warning Switch Circuit
DESCRIPTION
The unlock warning switch detects if the key is in the ignition key cylinder.
The unlock warning switch turns on when the key is inserted into the ignition
key cylinder and turns off
when the key is removed from the cylinder.
The body ECU is connected to the unlock warning swit ...
