
Toyota Sienna Service Manual: Fold Lock Switch Circuit
DESCRIPTION
Each of the left and right seats has a fold lock switch that detects the lock condition of the seat legs and floor when the seat is in the stowed state. If the fold lock switch detects an unlock condition, the 3rd SEAT indicator on the combination meter will come on.
WIRING DIAGRAM
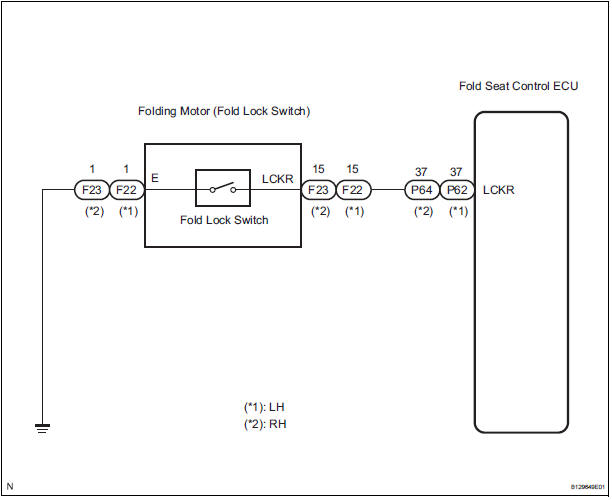
INSPECTION PROCEDURE
1 INSPECT FOLD SEAT CONTROL ECU
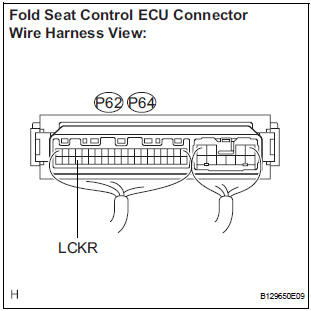
- Remove the fold seat control ECU with connectors still connected.
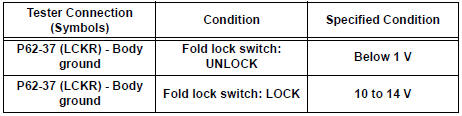
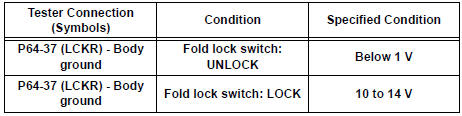
- Measure the voltage according to the value(s) in the table below.
Standard voltage LH side
RH side
2 CHECK HARNESS AND CONNECTOR (FOLD SEAT CONTROL ECU - FOLD LOCK SWITCH)
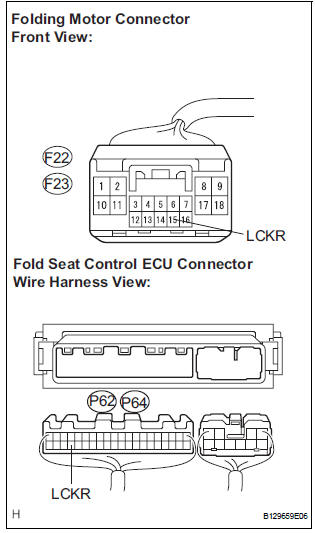
- Disconnect the connectors from the fold seat control ECU.
- Disconnect the connector from the fold lock switch.
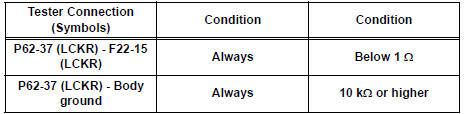
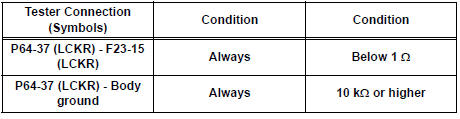
- Measure the resistance according to the value(s) in the table below.
Standard resistance LH side
RH side
3 CHECK HARNESS AND CONNECTOR (FOLD LOCK SWITCH - BODY GROUND)
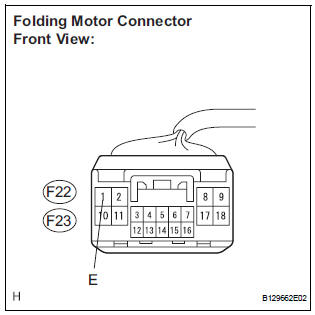
- Measure the resistance according to the value(s) in the table below.
Standard resistance LH side

RH side

4 INSPECT FOLD LOCK SWITCH
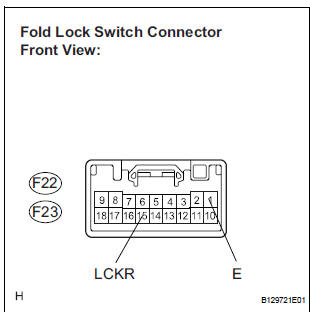
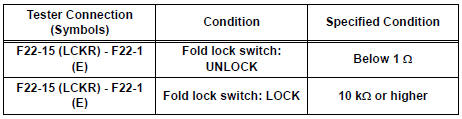
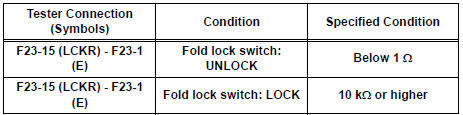
- Measure the resistance according to the value(s) in the table below.
Standard resistance LH side
RH side
REPLACE FOLD SEAT CONTROL ECU
 Rear Power Seat Switch Circuit
DESCRIPTION
When the power rear no. 2 seat switch is operated, a recline signal is sent
to the fold seat control ECU.
The ECU activates the reclining motor based on the signal from the power rea ...
 Seat memory switch
COMPONENTS
...
Other materials:
Meter Illumination does not Dim at Night
DESCRIPTION
Confirm that the vehicle is equipped with the optitron meter, then
check this circuit.
The combination meter assembly receives a auto dimmer signal from
the body ECU by the multiplex
communication line.
WIRING DIAGRAM
INSPECTION PROCEDURE
1 CHECK MULTIP ...
Key Lock-in Prevention Function does not Work Properly (Manual
Operation and Operation Interlocked with Key are Active)
DESCRIPTION
The un-lock warning switch turns ON when the key is inserted in the ignition
key cylinder. The courtesy
light switch turns ON when the driver side door is opened. These 2 switches are
monitored by the body
ECU.
In order to prevent the key from being locked in, the body ECU cont ...
Short in Rear Curtain Shield Squib LH Circuit
DTC B1635/87 Short in Rear Curtain Shield Squib LH Circuit
DESCRIPTION
The rear curtain shield squib LH circuit consists of the center airbag sensor
assembly and the curtain
shield airbag assembly LH.
The circuit instructs the SRS to deploy when deployment conditions are met.
DTC B1635/87 ...
