Toyota Sienna Service Manual: Installation
1. INSTALL CHARCOAL CANISTER ASSEMBLY
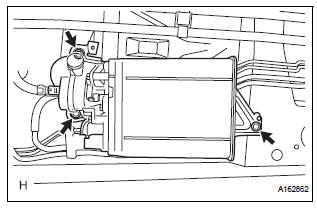
(a) Install the 3 bolts and charcoal canister.
Torque: 29 N*m (296 kgf*cm, 21 ft.*lbf) (b) Connect the purge line hose to the charcoal canister.
(c) Connect the wire harness clamp.
(d) Connect the vapor pressure sensor connector.
(e) Connect the charcoal canister filter sub-assembly to the charcoal canister.
(f) Connect the fuel tank vent hose to the charcoal canister.
2. INSTALL CHARCOAL CANISTER PROTECTOR
(a) Install the 6 bolts and charcoal canister protector.
Torque: 5.0 N*m (51 kgf*cm, 44 in.*lbf)
 Inspection
1. INSPECT CHARCOAL CANISTER ASSEMBLY
(a) Visually check the charcoal canister for cracks or
damage.
If cracks or damage are found, replace the charcoal
canister assembly.
(b) Check cha ...
 Vacuum switching valve
Components
...
Other materials:
Bluetooth Module Initialization Failed
DTC 57-47 Bluetooth Module Initialization Failed
DESCRIPTION
DTC No.
DTC Detection Condition
Trouble Area
57-47
Bluetooth module is not installed.
Problem with Bluetooth module
Problem in communication line to Bluetooth module
...
Precaution
1. TIRE PRESSURE WARNING SYSTEM PRECAUTION
(a) When the tire pressure warning light comes on,
immediately check the tire pressure of the tire and
adjust it to the specified value. (The tire pressure
warning light will come on after blinking for 1 minute
if there is an open in the tire press ...
VIN not Programmed or Mismatch - ECM / PCM
DESCRIPTION
DTC P0630 is set when the Vehicle Identification Number (VIN) is not stored
in the Engine Control Module
(ECM) or the input VIN is not accurate. Input the VIN with the intelligent
tester.
MONITOR STRATEGY
TYPICAL ENABLING CONDITIONS
TYPICAL MALFUNCTION THRESHOLDS ...
