Toyota Sienna Service Manual: Manual shifting test
1. Perform manual shifting test
Hint:
- With this test, it can be determined whether the trouble occurs in the electrical circuit or is a mechanical problem in the transaxle.
- If any abnormalities are found in the following test, the problem is in the transaxle itself.
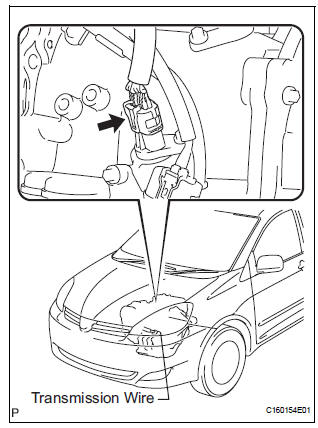
(A) disconnect the connector of the transmission wire.
(B) drive with the transmission wire disconnected.
Shifting the shift lever in the order of l, 2, 3, 4 and d
position to check whether the shifting condition
changes the table below.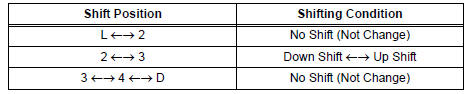
Hint:
When driving with the transmission wire disconnected, the shift lever position is in l or 2, the gear position is held in 3rd and the shift lever position is in 3, 4 or d, the gear position is held in 4th. However, when the shift position is in r or p, the operation is same as usual
(C) connect the connector of the transmission wire.
(D) clear the dtc (see page ax-27).
 Hydraulic test
1. Perform hydraulic test
(a) Measure the line pressure.
NOTICE:
Perform the test at the normal operating ATF
(Automatic Transmission Fluid) temperature:
50 to 80°C (122 to 1 ...
 Initialization
1. RESET MEMORY
NOTICE:
Perform the RESET MEMORY (AT initialization)
when replacing the automatic transaxle assembly,
engine assembly or ECM.
The RESET MEMORY can be performed ...
Other materials:
Basic repair hint
(a) HINTS ON OPERATIONS
BASIC REPAIR HINT
1
Attire
• Always wear a clean uniform.
• Hat and safety shoes must be worn.
2
Vehicle protection
Prepare a grille cover, fender cover, seat cover and floor mat before
starting the
operation.
3
...
Customize parameters
HINT:
The following item can be customized.
NOTICE:
After confirming whether the items requested by the
customer are applicable or not for customization,
perform the customize operation.
Be sure to record the current settings before
customizing.
When troubleshooting ...
Back Door Courtesy Switch Circuit
DESCRIPTION
The fold seat control ECU receives signals from the back door courtesy switch
and detects the state of the
back door (open/close). If the ECU does not detect that the back door is open,
the seat stowing and return
functions are not available.
WIRING DIAGRAM
INSPECTION PROCED ...
