
Toyota Sienna Service Manual: Mute Signal Circuit between Radio Receiver and Television Display Assembly
DESCRIPTION
The radio receiver controls the volume according to the MUTE signal from the television display assembly.
The MUTE signal is sent to reduce noise and a popping sound generated when switching the mode, etc.
If there is an open in the circuit, noise can be heard from the speakers when changing the sound source.
If there is a short in the circuit, even though the radio receiver is normal, no sound or, only an extremely small sound, can be produced.
WIRING DIAGRAM
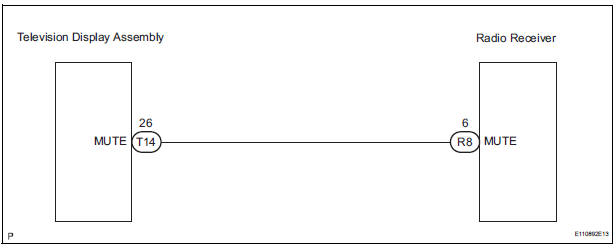
INSPECTION PROCEDURE
1 INSPECT TELEVISION DISPLAY ASSEMBLY
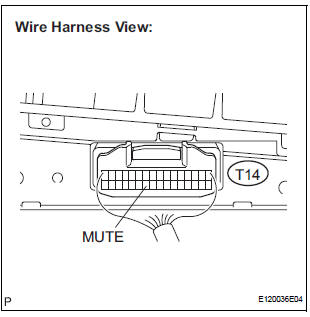
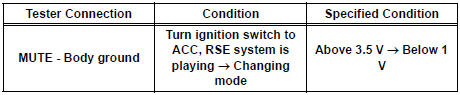
- Measure the voltage according to the value(s) in the table below.
Standard voltage
2 CHECK HARNESS AND CONNECTOR (RADIO RECEIVER - TELEVISION DISPLAY)
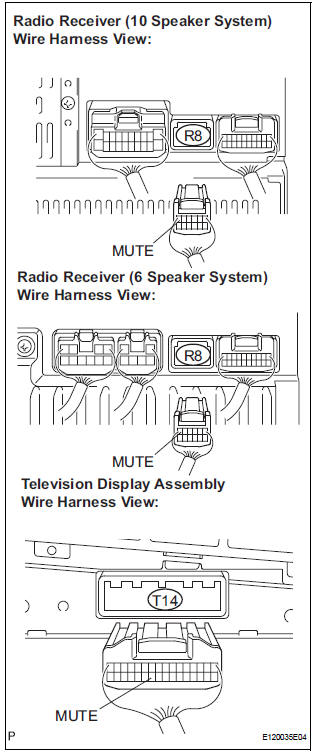
- Disconnect the radio receiver connector R8 and television display assembly connector T14.
- Measure the resistance according to the value(s) in the table below.
Standard resistance

3 REPLACE TELEVISION DISPLAY ASSEMBLY
- Replace the television display assembly and check if the audio system operates normally.
OK: The audio system operates normally
REPLACE RADIO RECEIVER
 Mute Signal Circuit between Radio Receiver and Stereo Component
Amplifier
Mute Signal Circuit between Radio Receiver and Stereo Component
Amplifier
DESCRIPTION
This circuit sends a signal to the stereo component amplifier to mute noise.
Because of that, the noise
produced by changing the sound source ceases.
If there is an open in the circ ...
 AVC-LAN Circuit
DESCRIPTION
Each unit of the audio system connected to the AVC-LAN (communication bus)
transfers the signal of
each switch by communication.
When a short to +B or short to ground occurs in this ...
Other materials:
Problem symptoms table
POWER SLIDE DOOR SYSTEM
Symptom
Suspected Area
Power slide door LH does not operate when switch* is
pressed (* switch indicates satellite switch for power
slide door LH and power slide door control switch LH)
ECU-B fuse
Power slide door main switch ...
Removal
HINT:
Remove the RH side by the same procedure as the LH side.
1. REMOVE FRONT WHEEL
2. DRAIN BRAKE FLUID
NOTICE:
Wash the brake fluid off immediately if it attaches to
any painted surface.
3. REMOVE FRONT DISC BRAKE CYLINDER SUBASSEMBLY
(a) Remove the union bolt and 2 gaskets from the f ...
Update contacts from phone
Operation methods differ between PBAP compatible and PBAP
incompatible but OPP compatible Bluetooth® phones.
If your cellular phone is neither PBAP nor OPP compatible, the contacts
cannot be transferred.
For PBAP Compatible Bluetooth® Phones
Select “Update Contacts from Phone�.
Che ...
