Toyota Sienna Service Manual: Removal
1. REMOVE REAR DOOR SCUFF PLATE
2. REMOVE REAR DOOR WEATHERSTRIP
3. REMOVE BACK DOOR WEATHERSTRIP
4. REMOVE BACK DOOR SCUFF PLATE
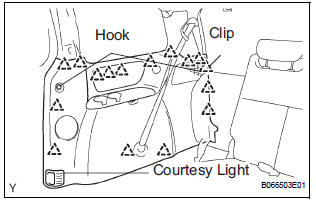
5. REMOVE FRONT QUARTER TRIM PANEL ASSEMBLY
- Remove the floor anchor cover.
- Remove the bolt and disconnect the No. 2 rear seat outer belt assembly on the floor anchor side.
- Remove the 2 package holder net hooks.
- Using a screwdriver, disengage the claw and remove the courtesy light.
- Disconnect the courtesy light connectors.
- Using a screwdriver, disengage the 16 clips and remove the quarter trim panel assembly.
HINT: Tape the screwdriver tip before use.
6. REMOVE REAR WINDOW SIDE GARNISH ASSEMBLY (0)
7. REMOVE NO. 1 REAR SEAT OUTER BELT ASSEMBLY (for 7-Passenger)
HINT: Refer to the instructions for disassembly of the rear No. 1 seat assembly (for captain seat type).
- Remove the rear seatback board RH.
- Remove the rear seat shoulder belt cover.
- Remove the bolt, nut and No. 1 rear seat outer belt assembly.
8. REMOVE 3 POINT TYPE REAR SEAT BELT ASSEMBLY (for 8-Passenger)
- Remove the nut and disconnect the 3 point type rear seat belt on the shoulder anchor side.
9. REMOVE NO. 2 REAR SEAT OUTER BELT ASSEMBLY
- Using a screwdriver, disengage the 2 claws and
remove the cover of the No. 2 rear seat outer belt
assembly on the shoulder anchor side.
HINT: Tape the screwdriver tip before use.
- Remove the bolt and disconnect the No. 2 rear seat outer belt assembly on the shoulder anchor side.
- Remove the bolt on the retractor side and remove the No. 2 rear seat outer belt assembly.
 Rear seat outer belt assembly
COMPONENTS
...
 Installation
1. INSTALL NO. 2 REAR SEAT OUTER BELT ASSEMBLY
NOTICE:
Do not disassemble the retractor.
Check the degree of tilt when the No. 2 rear seat
outer belt assembly begins to lock the ELR. ...
Other materials:
Unlocking and locking the doors from the inside
Door lock switch
Locks all the doors
Unlocks all the doors
Inside lock button
Locks the door
Unlocks the door
The front doors can be opened
by pulling the inside handle
even if the lock buttons are in
the lock position. ...
Open in One Side of CAN Branch Line
DESCRIPTION
If 2 or more ECUs and/or sensors do not appear on the intelligent tester
"Communication Bus Check"
screen, one side of the CAN branch wire may be open. (One side of the CAN-H
[branch wire] / CAN-L
[branch wire] of the ECU and/or sensor is open.)
Symptom
...
Camshaft Position "A" Actuator Circuit
DTC P0010 Camshaft Position "A" Actuator Circuit (Bank
1)
DTC P0020 Camshaft Position "A" Actuator Circuit (Bank
2)
DESCRIPTION
The Variable Valve Timing (VVT) system includes the ECM, Oil Control Valve (OCV)
and VVT controller.
The ECM sends a target duty-cycle control ...
