Toyota Sienna Service Manual: Removal
1. REMOVE CHARCOAL CANISTER PROTECTOR
(a) Remove the 6 bolts and charcoal canister protector.
2. REMOVE CHARCOAL CANISTER ASSEMBLY
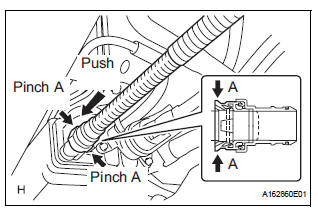
(a) Disconnect the fuel tank vent hose from the charcoal canister.
(1) Push the connector deep inside.
(2) Pinch portion A.
(3) Pull out the connector.
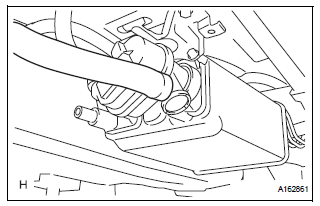
(b) Disconnect the charcoal canister filter sub-assembly from the charcoal canister.
(1) Push the connector deep inside.
(2) Pinch portion A.
(3) Pull out the connector.
(c) Disconnect the vapor pressure sensor connector.
(d) Disconnect the wire harness clamp.
(e) Disconnect the purge line hose from the charcoal canister.
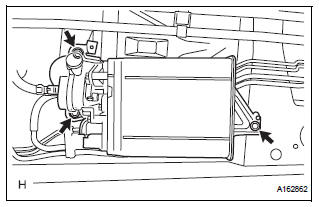
(f) Remove the 3 bolts and charcoal canister.
 Canister
Components
...
 Inspection
1. INSPECT CHARCOAL CANISTER ASSEMBLY
(a) Visually check the charcoal canister for cracks or
damage.
If cracks or damage are found, replace the charcoal
canister assembly.
(b) Check cha ...
Other materials:
ECM / PCM Processor
DTC P0606 ECM / PCM Processor
DESCRIPTION
The ECM continuously monitors its internal processors (CPUs), A/F sensor
transistors and heated oxygen
sensor (HO2S) transistors. This self-check ensures that the ECM is functioning
properly. These are
diagnosed by internal "mirroring" of t ...
Removal
1. REMOVE ENGINE ASSEMBLY WITH TRANSAXLE
HINT:
(See page EM-34)
2. REMOVE TRANSVERSE ENGINE ENGINE MOUNTING INSULATOR
(a) Remove the 3 nuts and transverse engine engine
mounting insulator.
3. REMOVE FRONT SUSPENSION ARM SUBASSEMBLY LOWER NO.1 LH
(a) Remove the 2 bolts on the front sid ...
Security Indicator Light Circuit
DESCRIPTION
Even when the theft deterrent system is in the disarmed state, the security
indicator blinks due to a signal
output from the immobiliser system. The security indicator blinks continuously
due to a continuous signal
received from the immobiliser system while in the armed state.
...
