
Toyota Sienna Service Manual: Transmission Range Sensor Circuit Malfunction (PRNDL Input)
DTC P0705 Transmission Range Sensor Circuit Malfunction (PRNDL Input)
DESCRIPTION
The park/neutral position switch detects the shift lever position and sends signals to the ECM.
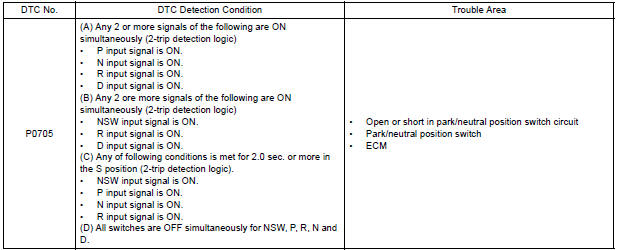
HINT: After confirming DTC P0705, use the intelligent tester to confirm the PNP switch signal in the ALL menu (to reach the ALL menu: DIAGNOSIS / ENHANCED OBD II / DATA LIST / ALL).
WIRING DIAGRAM
Refer to DTC P0705 for 2WD model or 4WD model.
INSPECTION PROCEDURE
Refer to DTC P0705 for 2WD model or 4WD model.
HINT: Read freeze frame data using the intelligent tester or OBD II scan tool. The ECM records vehicle and driving condition information as freeze frame data the moment a DTC is stored. When troubleshooting, freeze frame data can help determine if the vehicle was running or stopped, if the engine was warmed up or not, if the air-fuel ratio was LEAN or RICH, and other data from the time the malfunction occurred.
 Actuator Supply Voltage Circuit / Open
DTC P0657 Actuator Supply Voltage Circuit / Open
DESCRIPTION
The ECM monitors the output voltage to the throttle actuator. This self-check
ensures that the ECM is
functioning properly. The output ...
 Throttle Actuator Control Motor Circuit
DTC P2102 Throttle Actuator Control Motor Circuit Low
DTC P2103 Throttle Actuator Control Motor Circuit High
DESCRIPTION
The throttle actuator is operated by the ECM and opens and closes the
thro ...
Other materials:
ECM / PCM Internal Engine Off Timer Performance
DTC P2610 ECM / PCM Internal Engine Off Timer Performance
DTC SUMMARY
DESCRIPTION
To ensure the accuracy of the EVAP (Evaporative Emission) monitor values, the
soak timer, which is built
into the ECM, measures 5 hours (+/- 15 minutes) from when the ignition switch is
turned off, before t ...
Removal
1. REMOVE FRONT FENDER LINER LH
2. REMOVE FRONT FENDER LINER RH
3. REMOVE FRONT BUMPER COVER
4. REMOVE FRONT BUMPER ENERGY ABSORBER
5. REMOVE FRONT BUMPER REINFORCEMENT SUBASSEMBLY
6. REMOVE LASER SENSOR
Disconnect the connector and remove the laser the
sensor.
...
Short to GND in Rear Curtain Shield Squib LH
Circuit
DTC B1637/85 Short to GND in Rear Curtain Shield Squib LH
Circuit
DESCRIPTION
The rear curtain shield squib LH circuit consists of the center airbag sensor
assembly and the curtain
shield airbag assembly LH.
The circuit instructs the SRS to deploy when deployment conditions are met.
DTC ...
