
Toyota Sienna Service Manual: Turbine Speed Sensor Circuit No Signal

DESCRIPTION
This sensor detects the rotation speed of the input turbine. By comparing the input turbine speed signal (NT) with the counter gear speed sensor signal (NC), the ECM detects the shift timing of the gears and appropriately controls the engine torque and hydraulic pressure according to various conditions. Thus, providing smooth gear shift.

Reference (Using an oscilloscope): Check the waveform between terminals NT+ and NT- of the ECM connector.
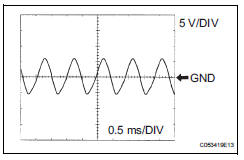
Standard: Refer to the illustration.

MONITOR DESCRIPTION
The NT terminal of the ECM detects a revolution signal from the speed sensor (NT) (input RPM). The ECM calculates a gearshift comparing the speed sensor (NT) with the speed sensor (NC).
While the vehicle is operating in 2nd, 3rd, 4th or 5th gear in the shift position of D, if the input shaft revolution is less than 300 rpm *1although the output shaft revolution is more than 1,000 rpm *2, the ECM detects the trouble, illuminates the MIL and stores the DTC.
*1: Pulse is not output or is irregularly output.
*2: The vehicle speed is 50 km/h (31 mph) or more.
MONITOR STRATEGY

TYPICAL ENABLING CONDITIONS
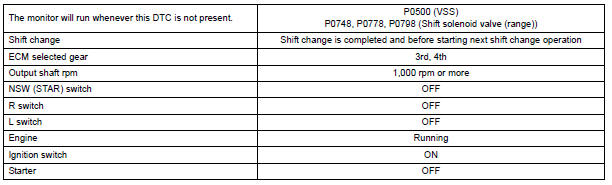
TYPICAL MALFUNCTION THRESHOLDS

COMPONENT OPERATING RANGE

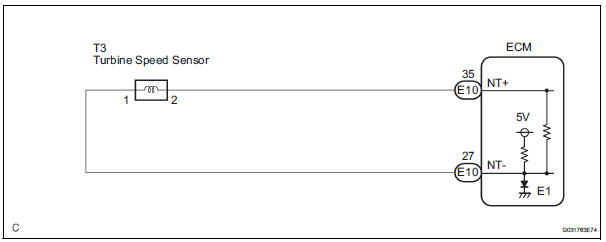
WIRING DIAGRAM
INSPECTION PROCEDURE
1 INSPECT SPEED SENSOR INSTALLATION
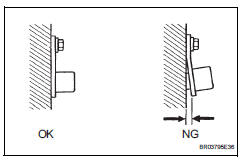
(a) Check the speed sensor installation.
OK: The installation bolt is tightened properly and there is no clearance between the sensor and transaxle case.


2 INSPECT SPEED SENSOR (NT)
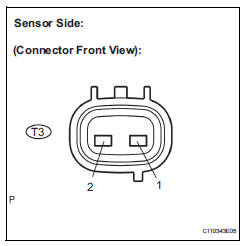
(a) Disconnect the speed sensor connector from the transaxle.
(b) Measure the resistance according to the value(s) in the table below.
Standard resistance



3 CHECK HARNESS AND CONNECTOR (SPEED SENSOR - ECM)
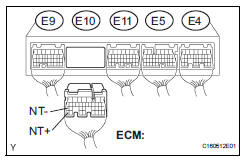
(a) Connect the speed sensor connector.
(b) Disconnect the ECM connector.
(c) Measure the resistance according to the value(s) in the table below.
Standard resistance

(d) Measure the resistance according to the value(s) in the table below.
Standard resistance (Check for short)



REPLACE ECM
 Transmission Fluid Temperature Sensor "A"
Performance
Transmission Fluid Temperature Sensor "A"
Performance
DESCRIPTION
The ATF (Automatic Transmission Fluid) temperature sensor converts the fluid
temperature into a
resistance value which is input into the ECM.
MONITOR DESCRIPTION
The ATF temp ...
 Brake Switch "B" Circuit High
DESCRIPTION
The purpose of this circuit is to prevent the engine from stalling while
driving in lock-up condition when
brakes are suddenly applied.
When the brake pedal is depressed, this s ...
Other materials:
Disposal
HINT:
Use the same procedures for the RH side and LH side.
The procedures listed below are for the LH side.
When scrapping a vehicle equipped with the SRS or
disposing of the curtain shield airbag assembly, be sure to
deploy the airbag first in accordance with the proce ...
Precaution
1. Check that the battery cables are connected to the
correct terminals.
2. Disconnect the battery cables when the battery is
given a quick charge.
3. Do not perform tests with a high voltage insulation
resistance tester.
4. Never disconnect the battery cables while the engine
is runnin ...
How to proceed with
troubleshooting
HINT:
The intelligent tester can be used in steps 2, 3, 4, 6 and 9.
1 VEHICLE BROUGHT TO WORKSHOP
2 CONNECT INTELLIGENT TESTER TO DLC3
HINT:
If the display indicates a communication fault in the tester,
inspect the DLC3.
3 CHECK DTC AND FREEZE FRAME DATA
(a) Check for DTC(s) and freeze f ...
