Toyota Sienna Service Manual: Active test
HINT:
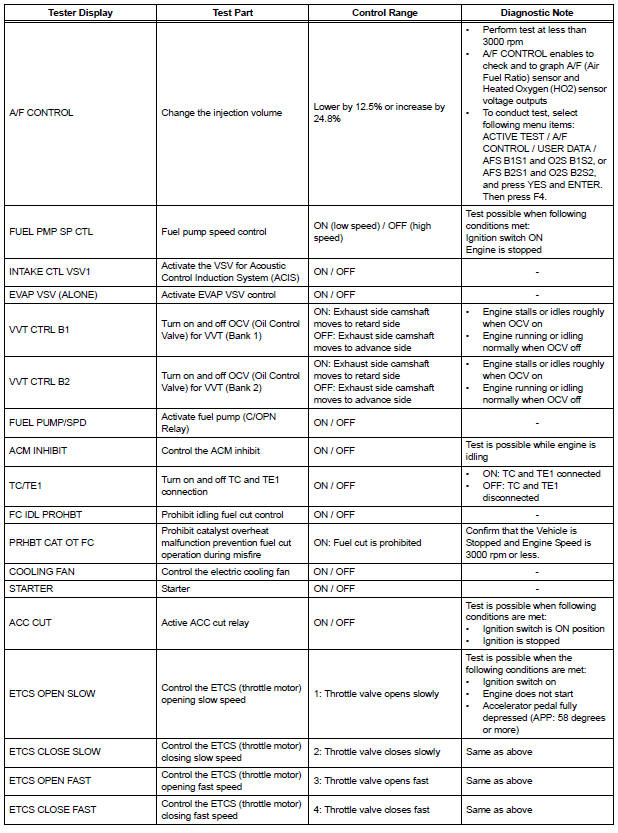
Performing an ACTIVE TEST enables components including the relays, VSV (Vacuum Switching Valve), and actuators, to be operated without removing any parts.
The ACTIVE TEST can be performed with an intelligent tester. Performing an ACTIVE TEST in the first step in troubleshooting is one method to shorten diagnostic time.
DATA LIST can be displayed during ACTIVE TESTs.
(a) Connect an intelligent tester to the DLC3.
(b) Start the engine.
(c) Turn the tester ON.
(d) Select the following menu items: DIAGNOSIS / ENHANCED OBD II / ACTIVE TEST.
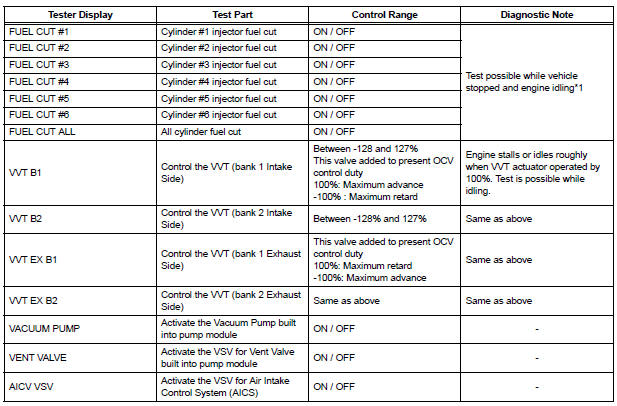
(e) Perform the ACTIVE TEST by referring to the table below.

NOTICE:
(a)Stop the engine and turn the ignition switch ON to turn FUEL CUT#1 (to #6) ON. (b)Start the engine. |
 Data list
HINT:
Reading the DATA LIST displayed on an intelligent tester
enables values, including those of the switches, sensors,
and actuators, to be checked without removing any
parts. Reading the DATA L ...
 System check
HINT:
Performing a SYSTEM CHECK enables the system,
which consists of the multiple actuators, to be operated
without removing any parts. In addition, it can show
whether or not any DTCs are set, a ...
Other materials:
Engine oil pressure switch
ON-VEHICLE INSPECTION
1. INSPECT ENGINE OIL PRESSURE SWITCH
ASSEMBLY
Disconnect the connector from the oil pressure
switch assembly.
With the switch still installed, measure the
resistance between the terminal of the engine oil
pressure switch and engine ground.
Standard ...
Unlocking and locking the doors from the inside
Door lock switch
Locks all the doors
Unlocks all the doors
Inside lock button
Locks the door
Unlocks the door
The front doors can be opened
by pulling the inside handle
even if the lock buttons are in
the lock position. ...
Torque Converter Clutch Solenoid Performance
(Shift Solenoid Valve DSL)
SYSTEM DESCRIPTION
The ECM uses the signals from the throttle position sensor, air-flow meter,
turbine (input) speed sensor,
intermediate (counter) shaft speed sensor and crankshaft position sensor to
monitor the engagement
condition of the lock-up clutch.
Then the ECM compares the eng ...
