Toyota Sienna Service Manual: Bluetooth tel check mode
HINT: Illustration may differ from the actual vehicle depending on the device settings and options. Therefore, some detailed area may not be shown exactly the same as on the actual vehicle.
1. ENTER DIAGNOSTIC MODE
2. BLUETOOTH TEL CHECK
- Select "Bluetooth TEL Check" from the "Diagnosis MENU" screen.
3. BLUETOOTH CHECK
- Select "Bluetooth Check" from the "Bluetooth Handsfree Check Menu" screen
- Select "Serial Communication Log" from the "Bluetooth Check Menu" screen.
- The communication log data in the display ECU are displayed on this screen.
HINT: The displayed data can be used as a reference.
- Select "Software Version" from the "Bluetooth Check Menu" screen.
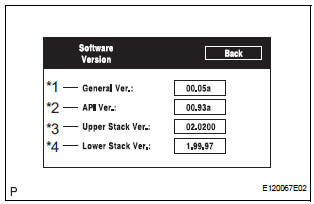
- Check the software version of the Bluetooth module.
Screen Description:
|
Display |
Contents |
| General Version / *1 |
|
| API Version / *2 | API software version is displayed. |
| Upper Stack Version / *3 | Upper Stack version is displayed |
| Lower Stack Version / *4 | Lower Stack version is displayed. |
HINT: This function is controlled by the built-in display ECU.
4. HANDSFREE VOICE QUALITY SET
- Select "Handsfree Voice Quality Set" from the "Bluetooth Handsfree check Menu" screen.
- Check the handsfree voice level.
Screen Description:
|
Display |
Contents |
| Received voice level adjustment / *1 | Setting possible for the voice level received from Bluetooth compatible phones. |
| Sent voice level adjustment / *2 | Setting possible for the voice set to Bluetooth compatible phones. |
HINT: This function is controlled by the built-in display ECU.
NOTICE: "Voice Quality Type" should not be changed.
 Display check mode
HINT:
This mode checks the color display on the display.
Illustrations may differ from the actual vehicle depending
on the device settings and options. Therefore, some
detailed a ...
 Navigation check mode
HINT:
This mode displays GPS satellite information.
Illustrations may differ from the actual vehicle depending
on the device settings and options. Therefore, some
detailed areas ...
Other materials:
System description
1. Radio and navigation assembly outline
Conventionally, 2 separate devices, a "radio and
display" and a "navigation ECU" are used. This
model has adopted a new type, combining these
devices into a single unit.
2. Navigation system outline
Vehicle ...
Speaker Circuit
DESCRIPTION
The sound signal that has been amplified by the stereo component amplifier is
sent to the speakers from
the stereo component amplifier through this circuit.
If there is a short in this circuit, the stereo component amplifier detects it
and stops output to the speakers.
Thus s ...
Detection range of the sensors
Approximately 2.0 ft. (60 cm)
Approximately 2.8 ft. (85 cm)
Approximately 5.9 ft. (180 cm)
The diagram shows the detection
range of the sensors. Note that the
sensors cannot detect obstacles
that are extremely close to the
vehicle.
The range of the sensors may
change depending ...
