Toyota Sienna Service Manual: Data list / active test
1. READ DATA LIST
HINT: Using the DATA LIST displayed on the intelligent tester, you can read the value of the switch, sensor, actuator, etc. without parts removal. Reading the DATA LIST as the first step in troubleshooting is one way to shorten the labor time.
- Connect the intelligent tester (with CAN VIM) to the DLC3.
- Turn the ignition switch on.
- Turn the tester ON.
- Enter the following menus: DIAGNOSIS / OBD/ MOBD / IMMOBILISER / DATA LIST.
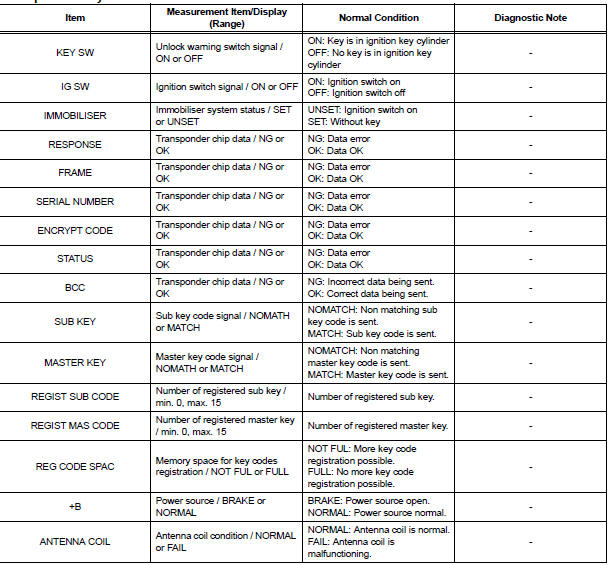
- Check the values by referring to the table below.
Transponder key ECU:
2. PERFORM ACTIVE TEST
HINT: Performing the ACTIVE TEST using the intelligent tester allows the relay, VSV, actuator, etc. to operate without removing any parts . Performing the ACTIVE TEST as the first step of troubleshooting is one way to shorten labor time.
- Connect the intelligent tester (with CAN VIM) to the DLC3.
- Turn the ignition switch on.
- Turn the tester ON.
- Enter the following menus: DIAGNOSIS / OBD/ MOBD / IMMOBILISER / ACTIVE TEST.
Transponder key ECU:

 DTC check / clear
1. CHECK DTC
Connect the intelligent tester to the Controller Area
Network Vehicle Interface Module (CAN VIM). Then
connect the CAN VIM to the DLC3.
Turn the ignition switch ...
 Diagnostic trouble code chart
If a trouble code is displayed during the DTC check, check
the circuit listed for that code. For details of each code, turn
the page mentioned below the "DTC No" in the DTC chart.
the & ...
Other materials:
Release Actuator Circuit
DESCRIPTION
The fold seat control ECU receives a switch operation signal from the fold
seat switch and activates the
release actuator. The release actuator releases the lock of the stowed seat
based on a drive voltage
received from the ECU.
WIRING DIAGRAM
INSPECTION PROCEDURE
1 INSPECT ...
Ignition Switch Circuit
DESCRIPTION
The Multiplex network body ECU receives the ACC and IG signals from the
ignition switch.
WIRING DIAGRAM
INSPECTION PROCEDURE
1 READ VALUE OF INTELLIGENT TESTER
Connect the intelligent tester to DLC3.
Turn the ignition switch ON and push the intelligent
tester main ...
Removal
NOTICE:
When installing, coat the parts indicated by the arrows
with power steering fluid or molybdenum disulfide
lithium base grease (See page PS-21).
1. INSPECT CENTER FRONT WHEEL
2. REMOVE FRONT WHEEL
3. SEPARATE TIE ROD ASSEMBLY LH
SST 09628-62011
4. SEPARATE TIE ROD ASSEMBLY RH
SST 096 ...
