Toyota Sienna Service Manual: Data list / active test
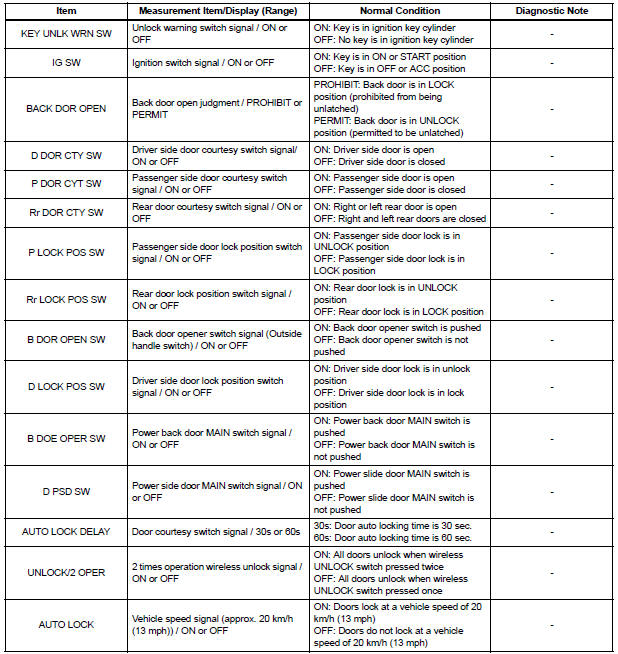
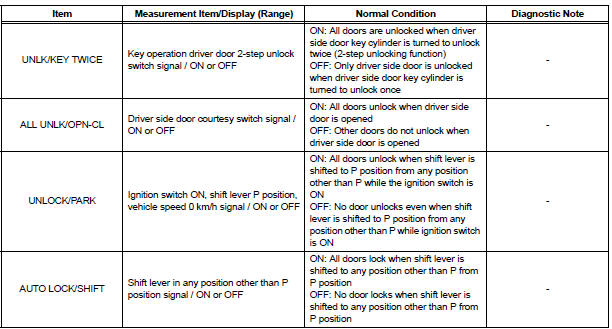
1. READ DATA LIST
HINT: Using the intelligent tester's DATA LIST allows switch, actuator and other item values to be read without removing any parts. Reading the DATA LIST early in troubleshooting is one way to save time.
- Connect the intelligent tester with CAN VIM to the DLC3.
- Turn the ignition switch ON.
- Read the DATA LIST.
BODY:
2. PERFORM ACTIVE TEST
HINT: Performing the intelligent tester's ACTIVE TEST allows relay, VSV, actuator, and other items to be operated without removing any parts. Performing the ACTIVE TEST early in troubleshooting is one way to save time.
The DATA LIST can be displayed during the ACTIVE TEST.
- Connect the intelligent tester with CAN VIM to the DLC3.
- Turn the ignition switch ON.
- Perform the ACTIVE TEST.
BODY:

- All Doors cannot be Locked / Unlocked at Once
- Key Lock-in Prevention Function does not Work Properly (Manual Operation and Operation Interlocked with Key are Active)
- Only Back Door cannot be Opened
 Diagnosis system
1. CHECK DLC3
The vehicle's ECU uses ISO 15765-4 for
communication protocol. The terminal arrangement
of the DLC3 complies with SAE J1962 and matches
the ISO 15765-4 format.
...
 All Doors cannot be Locked / Unlocked at Once
DESCRIPTION
The body ECU receives a switch signal from the master switch, the door
control switch, the driver door
key cylinder and the passenger door key cylinder and then drives the door lock
...
Other materials:
Removal
1. REMOVE REAR SEAT 3 POINT TYPE BELT
ASSEMBLY (for 8-Passenger)
HINT:
Refer to the instructions for disassembly of the rear No. 1
seat assembly (for center seat).
Remove the bolt and rear seat 3 point type belt
assembly.
2. REMOVE REAR SEAT 3 POINT TYPE BELT
ASSEMBLY (for 7-Pass ...
Reassembly
1. INSTALL LH REAR BUMPER SIDE RETAINER
Install the LH rear bumper side retainer with the 3
screws.
2. INSTALL RH REAR BUMPER SIDE RETAINER
Install the RH rear bumper side retainer with the 3
screws.
3. INSTALL REAR BUMPER REINFORCEMENT SUBASSEMBLY
Install the rear bumper reinf ...
Drive shaft
SST
RECOMMENDED TOOLS
HINT:
Torx is a registered trademark of Textron Inc.
EQUIPMENT
LUBRICANT
...
