
Toyota Sienna Service Manual: Monitor drive pattern
1. MONITOR DRIVE PATTERN FOR ECT TEST
(a) Perform this drive pattern as one method to simulate the detection conditions of the ECT malfunctions. (The DTCs may not be detected due the actual driving conditions. And some codes may not be detected through this drive pattern.)
HINT: Preparation for driving
- Warm up the engine sufficiently. (Engine coolant temperature is 60°C (140°F) or higher)
- Drive the vehicle when the atmospheric
temperature is -10°C (14°F) or higher.
(Malfunction is not detected when the atmospheric temperature is less than -10°C (14°F))
Driving note
- Drive the vehicle through all gears.
Stop → 1st → 2nd → 3rd → 4th → 5th → 5th (lock-up ON).
- Repeat the above driving pattern three times or more.
NOTICE:
|
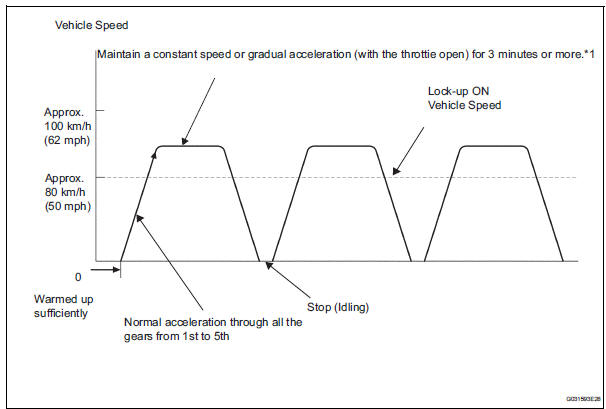
HINT: *1: Drive at such a speed in the uppermost gear, to engage lock-up. The vehicle can be driven at a speed lower than that in the above diagram under the lock-up condition.
| NOTICE: If necessary to drive the vehicle for approximately 30 minutes to detect DTC P0711 (ATF temperature sensor malfunction). |
 Initialization
1. RESET MEMORY
NOTICE:
Perform the RESET MEMORY (AT initialization)
when replacing the automatic transaxle assembly,
engine assembly or ECM.
The RESET MEMORY can be performed ...
 Problem symptoms table
HINT:
If a normal code is displayed during the diagnostic trouble
code check although the trouble still occurs, check the
electrical circuits for each symptom in the order given in
the chart ...
Other materials:
Short in Curtain Shield Squib LH Circuit
DTC B1165/87 Short in Curtain Shield Squib LH Circuit
DESCRIPTION
The curtain shield squib LH circuit consists of the center airbag sensor
assembly and the curtain shield
airbag assembly LH.
The circuit instructs the SRS to deploy when deployment conditions are met.
DTC B1165/87 is record ...
Removal
HINT:
Use the same procedures for the RH side and LH side.
The procedures listed below are for the LH side.
1. PRECAUTION
CAUTION:
Be sure to read "PRECAUTION" thoroughly before
servicing.
2. DISCONNECT CABLE FROM NEGATIVE BATTERY
TERMINAL
NOTICE:
Wait for 90 se ...
Throttle / Pedal Position Sensor / Switch "D"
Circuit Range / Performance
DTC P2121 Throttle / Pedal Position Sensor / Switch "D"
Circuit Range / Performance
HINT:
This DTC relates to the Accelerator Pedal Position (APP) sensor.
DESCRIPTION
Refer to DTC P2120
MONITOR DESCRIPTION
The accelerator pedal position sensor is mounted on the accelerator pedal ...
