Toyota Sienna Service Manual: Noise Occurs
INSPECTION PROCEDURE
1 NOISE CONDITION
- Check in which direction the noise comes from (front left or right, or rear left or right).
- Check in which direction the noise comes from.
OK: The location of the noise source can be determined
2 CHECK SPEAKERS
- Check the installation conditions of the speaker units that are located near the noise source and that there are no cracks, scratches, deformation, or other failures.
Result

3 CHECK NOISE CONDITIONS
- Check the noise condition.
HINT: The radio has a noise prevention function to reduce noise when listening to the radio. If a loud noise occurs, check whether the ground at the antenna mounting base and the noise prevention unit are installed and wired correctly

HINT:
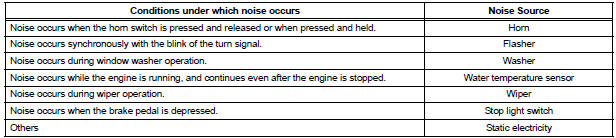
- In the chart's left column, find the situation that matches the customer's complaint. Then, in the right column, find the part that is causing the noise. Check the noise filter on or for the part.
- To save time and avoid a misdiagnosis, first make sure that the noise is not coming from outside the vehicle.
- Noise should be removed in descending order of loudness.
- Setting the radio to a frequency where no signal is received may make recognition of the noise problem easier.
OK: The noise source can not be determined.
PROCEED TO NEXT CIRCUIT INSPECTION SHOWN IN PROBLEM SYMPTOMS TABLE
 Disc cannot be Played/ No Playable Files/ Copyright Protection Error/ Disc
cannot be Played/ No Playable Files/ Copyright Protection Error
Disc cannot be Played/ No Playable Files/ Copyright Protection Error/ Disc
cannot be Played/ No Playable Files/ Copyright Protection Error
DTC 62-7D Disc cannot be Played
DTC 62-7E No Playable Files
DTC 62-7F Copyright Protection Error
DTC 63-7D Disc cannot be Played
DTC 63-7E No Playable Files
DTC 63-7F Copyright Protection Error
...
 Pressing Power Switch does not Turn on System
INSPECTION PROCEDURE
1 CHECK VEHICLE CONDITION
Check that conditions in the cabin are not likely to cause
condensation.
HINT:
This problem occurs when the cabin is humid and the
temperatur ...
Other materials:
How to proceed with troubleshooting
The intelligent tester can be used at steps 3, 7, 10, and 13.
1 VEHICLE BROUGHT TO WORKSHOP
2 CUSTOMER PROBLEM ANALYSIS
(a) Interview the customer to confirm the trouble.
3 DTC CHECK/CLEAR AND FREEZE FRAME DATA
4 PROBLEM SYMPTOM CONFIRMATION
5 PROBLEM SYMPTOM SIMULATION
6 SYMPTOM SI ...
Power steering
Sst
Recommended tools
EQUIPMENT
LUBRICANT
SSM
...
Inspection
1. INSPECT SEAT HEATER SWITCH LH
Measure the resistance of the seat heater switch
when the switch is operated.
Resistance
If the result is not as specified, replace the switch.
HINT:
As the dial is being turned, the resistance changes
gradually.
Push the seat h ...
