Toyota Sienna Service Manual: Reassembly
1. INSTALL NO. 1 SEAT CUSHION FRAME SUBASSEMBLY LH
- Install the seat cushion frame with the bolt.
Torque: Except 7-Passenger RH, M8 bolt 20.6 N*m (210 kgf*cm, 15 ft.*lbf) M10 bolt 41 N*m (418 kgf*cm, 30 ft.*lbf)
2. INSTALL RECLINING CONTROL LINK SUBASSEMBLY LH
- Install the reclining control link with the E-ring.
- Install the nut.
3. INSTALL REAR SEAT TRACK ADJUSTING HANDLE LH
- Install the seat track adjusting handle with the pin.
4. INSTALL REAR SEATBACK ADJUSTER ASSEMBLY OUTER LH
- Install the seatback adjuster assembly outer with
the bolt.
Torque: for 7-Passenger RH 55 N*m (561 kgf*cm, 41 ft.*lbf)
Except 7-Passenger 43.1 N*m (439 kgf*cm, 32 ft.*lbf) - Install the reclining remote control cable.
5. INSTALL NO. 1 REAR SEAT BELT ASSEMBLY OUTER RH (for 7-Passenger RH Side)
- Install the seat reclining sensor together with the
seat belt with the nut.
Torque: 4.0 N*m (41 kgf*cm, 35 in.*lbf)
6. INSTALL RECLINING CONNECTING PIPE LH
7. INSTALL NO. 1 REAR SEAT ADJUSTER ASSEMBLY INNER LH
- Install the seat adjuster with the bolt.
Torque: 43.1 N*m (439 kgf*cm, 32 ft.*lbf)
8. INSTALL NO.2 REAR SEAT HINGE COVER LH
- Install the hinge cover with the screw.
9. INSTALL REAR SEAT HINGE COVER LH
- Install the seat hinge cover with the screw.
10. INSTALL NO. 1 SEATBACK FRAME SUB-ASSEMBLY
- Install the seatback frame with the bolt.
Torque: for 7-Passenger RH inside 43.1 N*m (439 kgf*cm, 32 ft.*lbf)
for 7-Passenger RH outside 55 N*m (561 kgf*cm, 41 ft.*lbf) for others
43.1 N*m (439 kgf*cm, 32 ft.*lbf) - Install the seat belt retractor with the nut.
Torque: 42 N*m (428 kgf*cm, 31 ft.*lbf)
11. INSTALL REAR SEAT SHOULDER BELT COVER RH
12. INSTALL NO. 1 SEAT CUSHION COVER SUBASSEMBLY
- Install the seat cushion pad to the seat cushion cover.
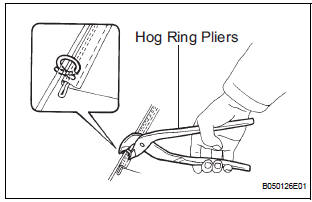
- Using hog ring pliers, install the seat cushion cover to the seat cushion pad with new hog rings.
NOTICE:
- Be careful not to damage the cover.
- When installing the hog rings, take care to prevent wrinkles as much as possible.
13. INSTALL NO. 1 SEATBACK COVER LH
- Install the seatback pad.
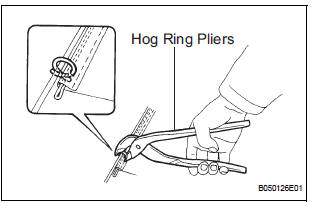
- Using hog ring pliers, completely install the seatback cover with new hog rings.
NOTICE:
- Be careful not to damage the cover.
- When installing the hog rings, take care to prevent wrinkles as much as possible.
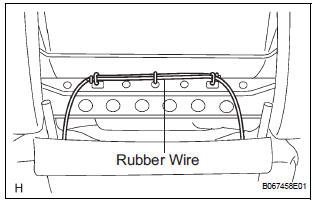
- Attach a rubber wire with new hog rings, as shown in the illustration.
- Using hog ring pliers, install new hog rings.
NOTICE:
- Be careful not to damage the cover.
- When installing the hog rings, take care to prevent wrinkles as much as possible.
- Install the 2 headrest supports.
14. INSTALL REAR SEATBACK LOCK BEZEL UPPER (for 7-Passenger RH Side)
15. INSTALL REAR SEATBACK BOARD LH
16. INSTALL REAR SEAT ARMREST ASSEMBLY RH (for 7-Passenger)
- Install the armrest with the bolt.
Torque: 37 N*m (377 kgf*cm, 27 ft.*lbf)
- Install the seat armrest No. 1 cap.
17. INSTALL REAR NO. 1 SEAT ARMREST ASSEMBLY LH (for 7-Passenger)
- Install the armrest with the bolt.
Torque: 37 N*m (377 kgf*cm, 27 ft.*lbf)
- Install the seat armrest No. 1 cap.
18. INSTALL FOLD SEAT STOPPER BAND ASSEMBLY
- Install the fold seat stopper band assembly with the screw.
19. INSTALL REAR SEAT 3 POINT TYPE BELT ASSEMBLY INNER
- Install the inner belt with the bolt.
Torque: 42 N*m (428 kgf*cm, 31 ft.*lbf)
20. INSTALL RECLINING ADJUSTER INSIDE COVER LH (for 7-Passenger)
- Install the reclining adjuster inside cover.
- Install the screw.
21. INSTALL REAR SEAT RECLINING COVER INNER LH (for 7-Passenger)
- Install the reclining cover inner.
- Install the 2 screws.
22. INSTALL RECLINING ADJUSTER INSIDE COVER LH
- Install the reclining adjuster inside cover.
- Install the 3 screws.
23. INSTALL REAR SEAT CUSHION SHIELD LH
- Install the cushion shield.
- Install the 2 screws.
24. INSTALL NO. 1 RECLINING ADJUSTER RELEASE HANDLE LH
- Install the reclining adjuster release handle.
25. INSTALL RECLINING ADJUSTER KNOB CAP LH
- Install the reclining adjuster knob cap.
26. INSTALL RH SEAT REAR SEAT LOCK COVER
- Install the seat lock cover with the 2 screws.
27. INSTALL LH SEAT REAR SEAT LOCK COVER
- Install the seat lock cover with the 2 screws.
28. INSTALL REAR SEAT LEG SIDE COVER LH
- Install the rear seat leg side cover LH with the 2 screws.
29. INSTALL REAR SEAT LEG COVER LH
- Install the rear seat leg cover LH with the 2 screws.
30. INSTALL REAR SEAT LEG COVER RH
- Install the rear seat leg cover RH with the 2 screws.
 Disassembly
1. REMOVE REAR SEAT LEG COVER LH
Remove the 2 screws and seat leg cover.
2. REMOVE REAR SEAT LEG COVER RH
Remove the 2 screws and seat leg cover.
3. REMOVE REAR SEAT LEG SIDE ...
 Installation
1. INSTALL REAR NO. 1 SEAT ASSEMBLY LH
Place the seat in the cabin.
NOTICE:
Be careful not to damage the body.
Install the seat.
7-Passenger RH:
Install the seat belt ...
Other materials:
Removal
HINT:
Remove the RH side by same procedures with LH side.
1. REMOVE FRONT WHEEL
2. REMOVE FRONT FENDER LINER LH
3. REMOVE FRONT SPEED SENSOR LH
(a) Disconnect the speed sensor connector.
(b) Remove the sensor harness and clamp from the
body.
(c) Remove the 2 clamp bolts holding the ...
Evaporator temperature sensor circuit
DESCRIPTION
The evaporator temperature sensor (A/C thermistor) is installed on the
evaporator in the air conditioning
unit. It detects the temperature of the cooled air that has passed through the
evaporator and its signal is
used to control the air conditioning. It sends a signal to the A/C ...
Disassembly
1. REMOVE RH SEAT REAR SEAT RECLINING COVER
Remove the 2 screws.
Remove the RH seat rear seat reclining cover by
pulling it out in the arrow mark direction shown in
the illustration.
2. REMOVE LH SEAT REAR SEAT RECLINING COVER
Remove the 2 screws.
R ...
