
Toyota Sienna Service Manual: Vehicle Position Mark Deviates Greatly
INSPECTION PROCEDURE
1 CHECK GPS MARK
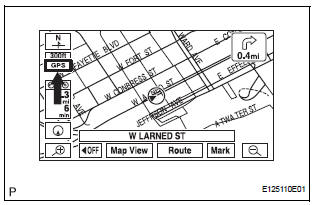
- Check that the GPS mark is displayed.
OK: GPS mark is displayed
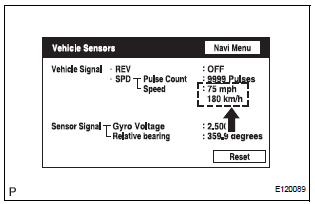
2 CHECK VEHICLE SENSOR (NAVIGATION CHECK MODE)
- Enter the "Navigation Check" mode (Vehicle Sensors).
- While driving the vehicle, compare the "Speed" indicator to the reading on the speedometer. Check that these readings are almost equal.
OK: The readings are almost equal.
3 CHECK VEHICLE SENSOR (NAVIGATION CHECK MODE)
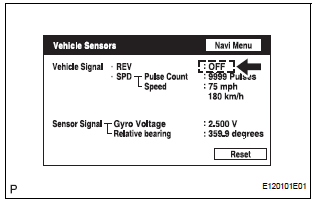
- Check that the display changes between ON and OFF according to the shift lever operation (P and R).
OK

HINT: The display is updated once per second. It is normal for the display to lag behind the actual switch operation.
PROCEED TO NEXT CIRCUIT INSPECTION SHOWN IN PROBLEM SYMPTOMS TABLE
 Map Disc cannot be Inserted
INSPECTION PROCEDURE
1 CHECK RADIO AND NAVIGATION ASSEMBLY
Check if a disc is inserted into the MAP disc slot.
Check if "DISC IN" is displayed.
OK:
"DISC IN&quo ...
 Cursor or Map Rotates when Vehicle Stopped
INSPECTION PROCEDURE
1 CHECK CONDITION
Check with the customer if the vehicle has been turned
by a turntable.
OK:
Vehicle has not been turned by turntable.
HINT:
If the vehicle is t ...
Other materials:
Removal
CAUTION:
Wear safety gloves, because the sharp surfaces of the
seatback frame and seat adjuster may injure your
hand.
Work must be started more than 90 seconds after the
ignition switch is turned to the LOCK position and the
negative (-) terminal cable is disconnected from ...
Disassembly
HINT:
On the RH side, use the same procedures as on the LH side.
1. REMOVE FRONT DOOR LOWER FRAME BRACKET GARNISH LH
Using a screwdriver, disengage the clip and claw,
and remove the garnish.
HINT:
Tape the screwdriver tip before use.
2. REMOVE FRONT DOOR INSIDE HANDLE BEZEL PLUG LH
...
Automatic transaxle fluid
On-vehicle inspection
1. CHECK FLUID LEVEL
HINT:
Drive the vehicle so that the engine and transaxle are at
normal operating temperature.
Fluid temperature:
70 to 80°C (158 to 176°F)
(a) Park the vehicle on a level surface and set the
parking brake.
(b) With the engine idling and the ...
