
Toyota Sienna Service Manual: Vehicle Speed Sensor "A"

DESCRIPTION
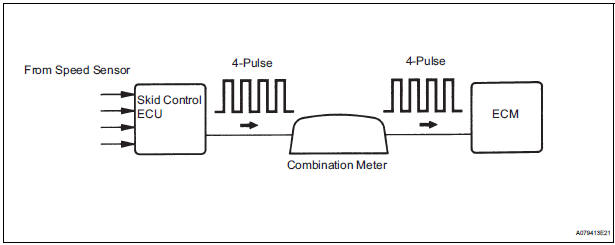
The speed sensor detects the wheel speed and sends the appropriate signals to the skid control ECU.
The skid control ECU converts these wheel speed signals into a 4-pulse signal and outputs it to the ECM via the combination meter. The ECM determines the vehicle speed based on the frequency of these pulse signals.

MONITOR DESCRIPTION
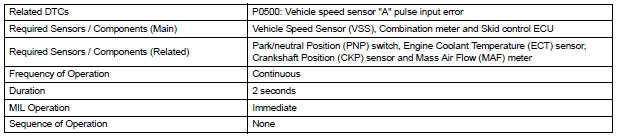
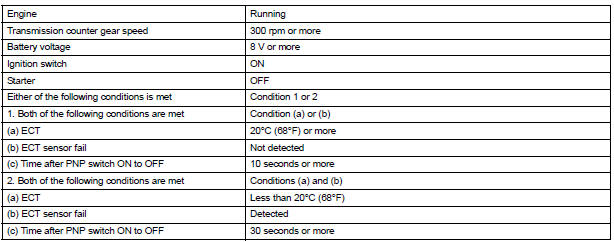
The ECM assumes that the vehicle is being driven when the transmission counter gear indicates more than 300 rpm and over 30 seconds have passed since the park / neutral position switch was turned OFF.
If thre is no signal from the vehicle speed sensor with these conditions satisfied, the ECM concludes that the vehicle speed sensor is malfunctioning. The ECM will turn on the MIL and a DTC will be set.
MONITOR STRATEGY
TYPICAL ENABLING CONDITIONS

TYPICAL MALFUNCTION THRESHOLDS

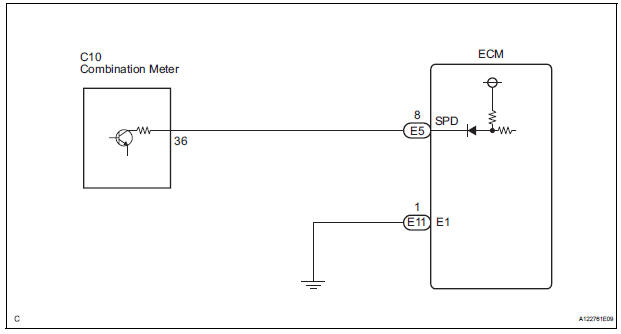
WIRING DIAGRAM
INSPECTION PROCEDURE
HINT:
Read freeze frame data using the intelligent tester. The ECM records vehicle and driving condition information as freeze frame data the moment a DTC is stored. When troubleshooting, freeze frame data can be helpful in determining whether the vehicle was running or stopped, whether the engine was warmed up or not, whether the air-fuel ratio was lean or rich, as well as other data recorded at the time of a malfunction.
1 CHECK SPEEDOMETER
(a) Drive the vehicle and check whether the operation of the speedometer in the combination meter is normal.
HINT:
- The vehicle speed sensor is operating normally if the speedometer reading is normal.
- If the speedometer does not operate, check it by following the procedure described in speedometer malfunction.


2 READ VALUE OF INTELLIGENT TESTER (VEHICLE SPEED)
(a) Connect the intelligent tester to the DLC3.
(b) Turn the ignition switch to the ON position.
(c) Turn the tester on.
(d) Select the following menu items: DIAGNOSIS / ENHANCED OBD II / DATA LIST / PRIMARY / VEHICLE SPD.
(e) Drive the vehicle.
(f) Read the value displayed on the tester.
OK: Vehicle speeds displayed on tester and speedometer display are equal.


3 CHECK COMBINATION METER ASSEMBLY (+S VOLTAGE)
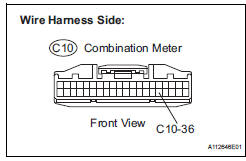
(a) Disconnect the C10 combination meter connector.
(b) Turn the ignition switch to the ON position.
(c) Measure the voltage between the terminal of the combination meter and body ground.
Standard voltage 
(d) Reconnect the combination meter connector.


4 CHECK COMBINATION METER ASSEMBLY (SPD SIGNAL WAVEFORM)
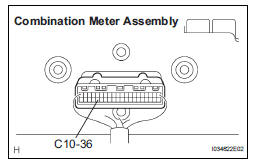
(a) Shift the transmission gear selector lever to the neutral position.
(b) Jack up the vehicle.
(c) Turn the ignition switch to the ON position.
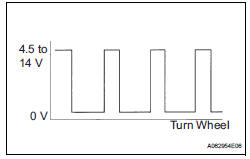
(d) Measure the voltage between the terminal of the combination meter and body ground while the wheel is turned slowly.
Standard voltage 
HINT:
The output voltage should fluctuate up and down, similarly to the diagram, when the wheel is turned slowly.


5 CHECK HARNESS AND CONNECTOR (COMBINATION METER ASSEMBLY - ECM)
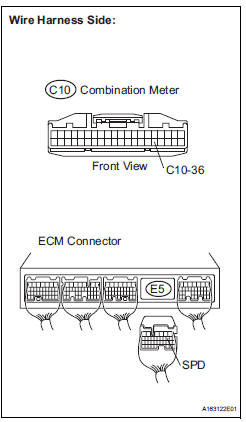
(a) Disconnect the C10 combination meter connector.
(b) Disconnect the E5 ECM connector.
(c) Measure the resistance.
Standard resistance (Check for open)

Standard resistance (Check for short)

(d) Reconnect the combination meter connector.
(e) Reconnect the ECM connector.


REPLACE ECM (See page ES-498)
 Evaporative Emission Control System Leak Detected
DTC SUMMARY
DESCRIPTION
The circuit description can be found in the EVAP (Evaporative Emission)
System (See page ES-409).
INSPECTION PROCEDURE
Refer to the EVAP System (See page ES-412).
...
 Brake Switch
DESCRIPTION
The stop light switch is a duplex system that transmits two signals: STP and
ST1-. These two signals are
used by the ECM to monitor whether or not the brake system is working prope ...
Other materials:
Linked mirror function when reversing (if equipped)
When the mirror select switch is in the L or R position, the outside rear
view mirrors will automatically angle downwards when the vehicle is
reversing in order to give a better view of the ground.
To disable this function, move the mirror select switch to the neutral
position (between L and R ...
Power Source Circuit
DESCRIPTION
This is the power source circuit for the outer mirror control ECU.
WIRING DIAGRAM
INSPECTION PROCEDURE
1 INSPECT OUTER MIRROR CONTROL ECU (POWER SOURCE)
Disconnect the O9 or O11 ECU connector.
Measure the voltage and resistance according to the
value(s) in the t ...
Locking and unlocking the back door
Entry function (vehicles with a smart key system)
Carry the electronic key to enable this function.
Press the unlock button to
unlock all the doors.
The door cannot be unlocked for
3 seconds after the door is
locked.
Lock the back door again when
you leave the vehicle. The back
...
