Toyota Sienna Service Manual: Voice Recognition Difficulty
INSPECTION PROCEDURE
1 CHECK CONDITION
- Check if the system's voice recognition level is low by using only one particular voice.
OK: System's voice recognition level is low with any voice.
2 CHECK MAP DISC
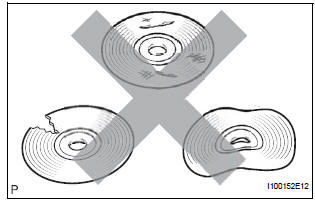
- Check that the map disc is not deformed or cracked.
OK: No deformations or cracks on map disc.
3 CHECK MAP DISC

- Check for dirt on the map disc surface.
OK: No dirt is on map disc surface.
NOTICE: Do not use a conventional record cleaner or antistatic preservative.
HINT: If the disc is dirty, clean the disc by wiping the disc's surface radially with a soft cloth.
4 CHECK MICROPHONE (NAVIGATION CHECK MODE)
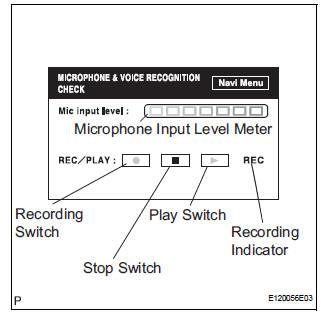
- Enter the "MICROPHONE & VOICE RECOGNITION CHECK" mode.
- When voice is input into the microphone, check that the microphone input level meter changes according to the input voice.
- Push the recording switch and perform voice recording.
HINT: Voice can be recorded up to 5 seconds.
- Check that the recording indicator remains on while recording and that the recorded voice is played normally without noise or distortion.
OK: All check results are normal.
END
 Route cannot be Calculated
INSPECTION PROCEDURE
1 CHECK MAP DISC
Check that the map disc is not deformed or cracked.
OK:
No deformations or cracks on map disc.
2 SET DESTINATION
Set another destination and che ...
 Voice is not Recognized
INSPECTION PROCEDURE
1 CHECK NAVIGATION SETTINGS
Enter the "Menu" screen by pressing the "MENU" switch.
Select "Setup
Check that "Voice Recogni ...
Other materials:
Fail-safe chart
1. FAIL-SAFE
This function minimizes the loss of the ECT functions
when any malfunction occurs in a sensor or solenoid.
(a) ATF (Automatic Transmission Fluid) temperature
sensor:
When the ATF temperature sensor has a
malfunction, 5th upshift is prohibited.
(b) Counter gear speed sensor NC ...
Transmission Range Sensor Circuit Malfunction
(PRNDL Input)
DESCRIPTION
The park/neutral position switch detects the shift lever position and sends
signals to the ECM.
MONITOR DESCRIPTION
These DTCs indicate a problem with the park/neutral position switch and the
wire harness in the park/
neutral position switch circuit.
The park/neutral po ...
Internal Control Module Random Access Memory
(RAM) Error
DTC P0604 Internal Control Module Random Access Memory
(RAM) Error
DESCRIPTION
The ECM continuously monitors its own internal memory status, internal
circuits, and output signals
transmitted to the throttle actuator. This self-check ensures that the ECM is
functioning properly. If any
malfu ...
