Toyota Sienna Service Manual: Wrong Disc/ Disc cannot be Read
DTC 44-41 Wrong Disc
DTC 44-42 Disc cannot be Read
DESCRIPTION
|
DTC No. |
DTC Detection Condition |
Trouble Area |
| 44-41 | An unsuitable disc is inserted |
|
| 44-42 | The disc cannot be read. |
INSPECTION PROCEDURE
HINT: After the inspection is completed, clear the DTCs
1 CHECK DISC
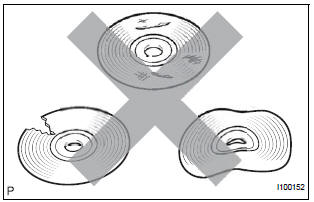
- Check that the disc is not deformed or cracked.
OK: No deformation or cracks on the disc.
2 DISC CLEANING
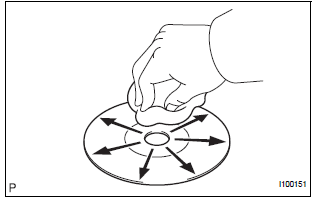
- Disc cleaning
- If dirt is on the disc surface, wipe it clean with a soft cloth from the inside to the outside in a radial direction.
NOTICE: Do not use a conventional record cleaner or antistatic preservative.
3 CLEAR DTC
- Clear the DTC
4 RECHECK DTC
- Recheck DTCs and check if the same trouble occurs again.
OK: Malfunction disappears
5 REPLACE DISC WITH ANOTHER AND RECHECK
- Replace the disc with another and recheck.
- Replace the disc with another normal one.
- Clear the DTCs.
- Recheck for DTCs and check if the same trouble occurs again.
OK: Malfunction disappears.
END
 DVD Player Mechanical Error/ DVD Insertion and Ejection Error/ DVD Reading
Abnormal
DVD Player Mechanical Error/ DVD Insertion and Ejection Error/ DVD Reading
Abnormal
DTC 44-10 DVD Player Mechanical Error
DTC 44-11 DVD Insertion and Ejection Error
DTC 44-12 DVD Reading Abnormal
DESCRIPTION
TC No.
DTC Detection Condition
Trouble Area
...
 DVD-ROM Abnormal
DVD-ROM Abnormal
DESCRIPTION
DTC No.
DTC Detection Condition
Trouble Area
44-43
DVD-ROM operation is abnormal.
DVD
Television display a ...
Other materials:
Terminals of ECU
1. CHECK POWER BACK DOOR ECU
Disconnect the P13 and P14 ECU connectors, and
check the voltage or resistance of each terminal of
the wire harness side connectors
If the result is not as specified, there may be a
malfunction on the wire harness side.
Reconnect the ECU connector ...
Mirror Switch Circuit
DESCRIPTION
A switch signal of the outer mirror switch is transmitted to the
selected outer mirror control ECU by way
of the body ECU. Then, the outer mirror control ECU activates the mirror
motor to move the mirror UP,
DOWN, RIGHT and LEFT in response to the inputs.
HINT:
Th ...
Open in ABS Solenoid Relay Circuit
DESCRIPTION
This relay supplies power to each ABS solenoid.
Immediately after the ignition switch is turned to the ON position, the relay
turns on if the solenoid is
determined to be normal as a result of self-diagnosis during initial check.
The relay turns off if an open/short is dete ...
