Toyota Sienna Service Manual: CD Sound Skips
INSPECTION PROCEDURE
1 CHECK CD
- Check the CD.
OK: The CD is clean.
HINT: If dirt is on the CD surface, wipe it clean with a soft cloth from the inside to the outside in a radial direction.
NOTICE: Do not use a conventional record cleaner or antistatic preservative.
2 CHECK CD
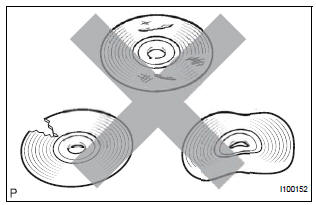
- Check that the CD is not deformed or cracked.
OK: No deformation or cracks on the CD.
3 CHECK OPERATION ANOTHER CD
- Check using another CD.
- Check if the problem recurs using another CD.
OK: The problem does not occur
4 CHECK RADIO AND NAVIGATION ASSEMBLY
- Check the radio and navigation assembly installation condition.
- Check that the radio and navigation assembly is properly installed.
OK: Radio and navigation assembly is properly installed.
REPLACE RADIO AND NAVIGATION ASSEMBLY
 CD cannot be Inserted / Played or CD is Ejected Right After Insertion
INSPECTION PROCEDURE
1 CHECK IF A PROPER CD IS INSERTED
Make sure that the CD is an audio CD or a CD with an
MP3 or WMA file, and that it is not deformed, flawed,
stained, burred, or otherwis ...
 Radio Broadcast cannot be Received or Poor Reception
INSPECTION PROCEDURE
1 CHECK RADIO AND NAVIGATION ASSEMBLY
Check the radio's automatic station search function.
Check the radio's automatic station search function
by activating it.
OK ...
Other materials:
Rear Air Conditioning Control Panel Circuit
DESCRIPTION
This is the rear A/C system control signal circuit as well as the power
supply circuit of the rear A/C control
assembly.
Pulse signals regarding rear A/C control panel switch operation are transmitted
between the A/C amplifier
and rear A/C control assembly.
WIRING DIAGRAM
...
Removal
HINT:
Use the same procedures for the RH side and LH side.
The procedures listed below are for the LH side.
1. PRECAUTION
CAUTION:
Be sure to read "PRECAUTION" thoroughly before
servicing.
2. DISCONNECT CABLE FROM NEGATIVE BATTERY
TERMINAL
CAUTION:
Wait for 90 s ...
On-vehicle inspection
1. INSPECT FRONT AXLE HUB BEARING BACKLASH
(a) Using a dial gauge, check for backlash near the
center of the axle hub.
Maximum:
0.05 mm (0.0020 in.)
If backlash exceeds the maximum, replace the
bearing.
NOTICE:
Ensure that the dial gauge is set at right angles
to the measurement surface ...
