
Toyota Sienna Service Manual: Illumination for Panel Switch does not Come on with Tail Switch ON
INSPECTION PROCEDURE
1 CHECK VEHICLE SIGNAL (DISPLAY CHECK MODE)
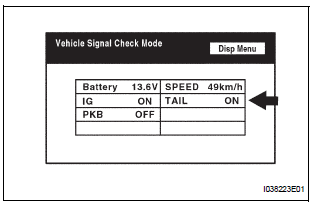
- Enter the "Display Check" mode (Vehicle Signal Check Mode).
- Check that the display changes between ON and OFF according to the light control switch operation.
OK

HINT: This display is updated once per second. As a result, it is normal for the display to lag behind the actual change in the switch
REPLACE RADIO AND NAVIGATION ASSEMBLY
 Radio Broadcast cannot be Received or Poor Reception
INSPECTION PROCEDURE
1 CHECK RADIO AND NAVIGATION ASSEMBLY
Check the radio's automatic station search function.
Check the radio's automatic station search function
by activating it.
OK ...
 Display does not Dim when Light Control Switch is Turned ON
INSPECTION PROCEDURE
1 CHECK IMAGE QUALITY SETTING
Enter the display adjustment screen by pressing the
"DISPLAY" switch.
Turn the light control switch to the TAIL position ...
Other materials:
Sound Signal Circuit between Radio Receiver and Stereo Jack Adapter
DESCRIPTION
The stereo jack adapter sends an external device sound signal to the radio
receiver through this circuit.
The sound signal that has been sent is amplified by the stereo component
amplifier or radio receiver, and
then is sent to the speakers.
If there is an open or short in th ...
Repeat play
Select to change on/off.
Using cellular phones
Interference may be heard through the audio system’s speakers if a cellular
phone is being used inside or close to the vehicle while the audio system is
operating.
Certification (caution)
Laser product
This product is a class 1 laser product.
...
Installation
1. INSTALL CHARCOAL CANISTER ASSEMBLY
(a) Install the 3 bolts and charcoal canister.
Torque: 29 N*m (296 kgf*cm, 21 ft.*lbf)
(b) Connect the purge line hose to the charcoal
canister.
(c) Connect the wire harness clamp.
(d) Connect the vapor pressure sensor connector.
(e) Connect t ...
