
Toyota Sienna Service Manual: Pressure Control Solenoid "B" Electrical (Shift Solenoid Valve SL2)

DESCRIPTION
Shifting from 1st to 5th is performed in combination with "ON" and "OFF"
operation of the shift solenoid
valves SL1, SL2, SL3, S4 and SR which are controlled by the ECM. If an open or
short circuit occurs in
either of the shift solenoid valves, the ECM controls the remaining normal shift
solenoid valves to allow
the vehicle to be operated smoothly (Fail safe function).
MONITOR DESCRIPTION
The ECM commands gear shifts by turning the shift solenoid valves "ON/OFF". When there is an open or short circuit in any shift solenoid valve circuit, the ECM detects the problem and illuminates the MIL and stores the DTC. And the ECM performs the fail-safe function and turns the other normal shift solenoid valves "ON/OFF" (In case of an open or short circuit, the ECM stops sending current to the circuit.) (See page AX-30).
MONITOR STRATEGY

TYPICAL ENABLING CONDITIONS

TYPICAL MALFUNCTION THRESHOLDS

COMPONENT OPERATING RANGE

WIRING DIAGRAM
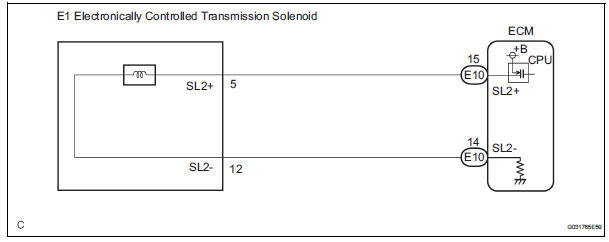
INSPECTION PROCEDURE
1 INSPECT TRANSMISSION WIRE (SL2)
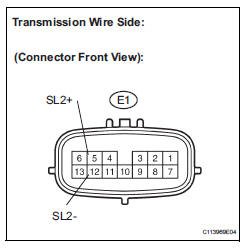
(a) Disconnect the transmission wire connector from the transaxle.
(b) Measure the resistance according to the value(s) in the table below.
Standard resistance

(c) Measure the resistance according to the value(s) in the table below.
OK:
Standard resistance (Check for short)



2 CHECK HARNESS AND CONNECTOR (TRANSMISSION WIRE - ECM)
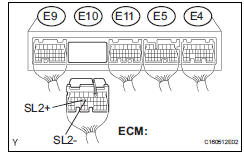
(a) Connect the transmission wire connector to the transaxle.
(b) Disconnect the connector from the ECM.
(c) Measure the resistance according to the value(s) in the table below.
Standard resistance

(d) Measure the resistance according to the value(s) in the table below.
OK:
Standard resistance (Check for short)



REPLACE ECM
3 INSPECT SHIFT SOLENOID VALVE SL2
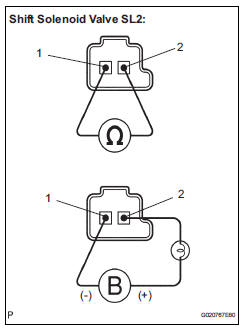
(a) Remove the shift solenoid valve SL2.
(b) Measure the resistance according to the value(s) in the table below.
Standard resistance
c) Connect the positive (+) lead with a 21 W bulb to terminal 2 and the negative (-) lead to terminal 1 of the solenoid valve connector, then check the movement of the valve.
OK: The solenoid makes an operating sound.


REPAIR OR REPLACE TRANSMISSION WIRE
 Pressure Control Solenoid "B" Performance (Shift
Solenoid Valve SL2)
Pressure Control Solenoid "B" Performance (Shift
Solenoid Valve SL2)
SYSTEM DESCRIPTION
The ECM uses signals from the vehicle speed sensor to detect the actual gear
position (1st, 2nd, 3rd, 4th
or 5th gear).
Then the ECM compares the actual gear with the shi ...
 Intermediate Shaft Speed Sensor "A"
DESCRIPTION
This sensor detects the rotation speed of the counter gear. By comparing the
counter gear speed signal
(NC) with the direct clutch speed sensor signal (NT), the ECM detects the shift
...
Other materials:
Access monitor result
(A) select the following menus on the intelligent tester:
diagnosis, enhanced obdii, monitor info
and monitor result. The monitor status
appears after the component name.
INCMP: The component has not been monitored
yet.
PASS: The component is functioning normally.
FAIL: The component is ...
Hitch
Trailer hitch assemblies have different weight capacities. Toyota recommends
the use of Toyota hitch/bracket for your vehicle. For details,
contact your Toyota dealer.
If you wish to install a trailer hitch, contact your Toyota
dealer.
Use only a hitch that conforms to the gross trailer w ...
Listening to an iPod
Connecting an iPod enables you to enjoy music from the vehicle
speakers.
Select “iPod� on the audio source selection screen.
When the iPod connected to the system includes iPod video, the
system can only output the sound by selecting the browse
screen.
Connecting an iPod
Audio control ...
